Saturday, February 4, 2017

2 busy hours at Pegasus...

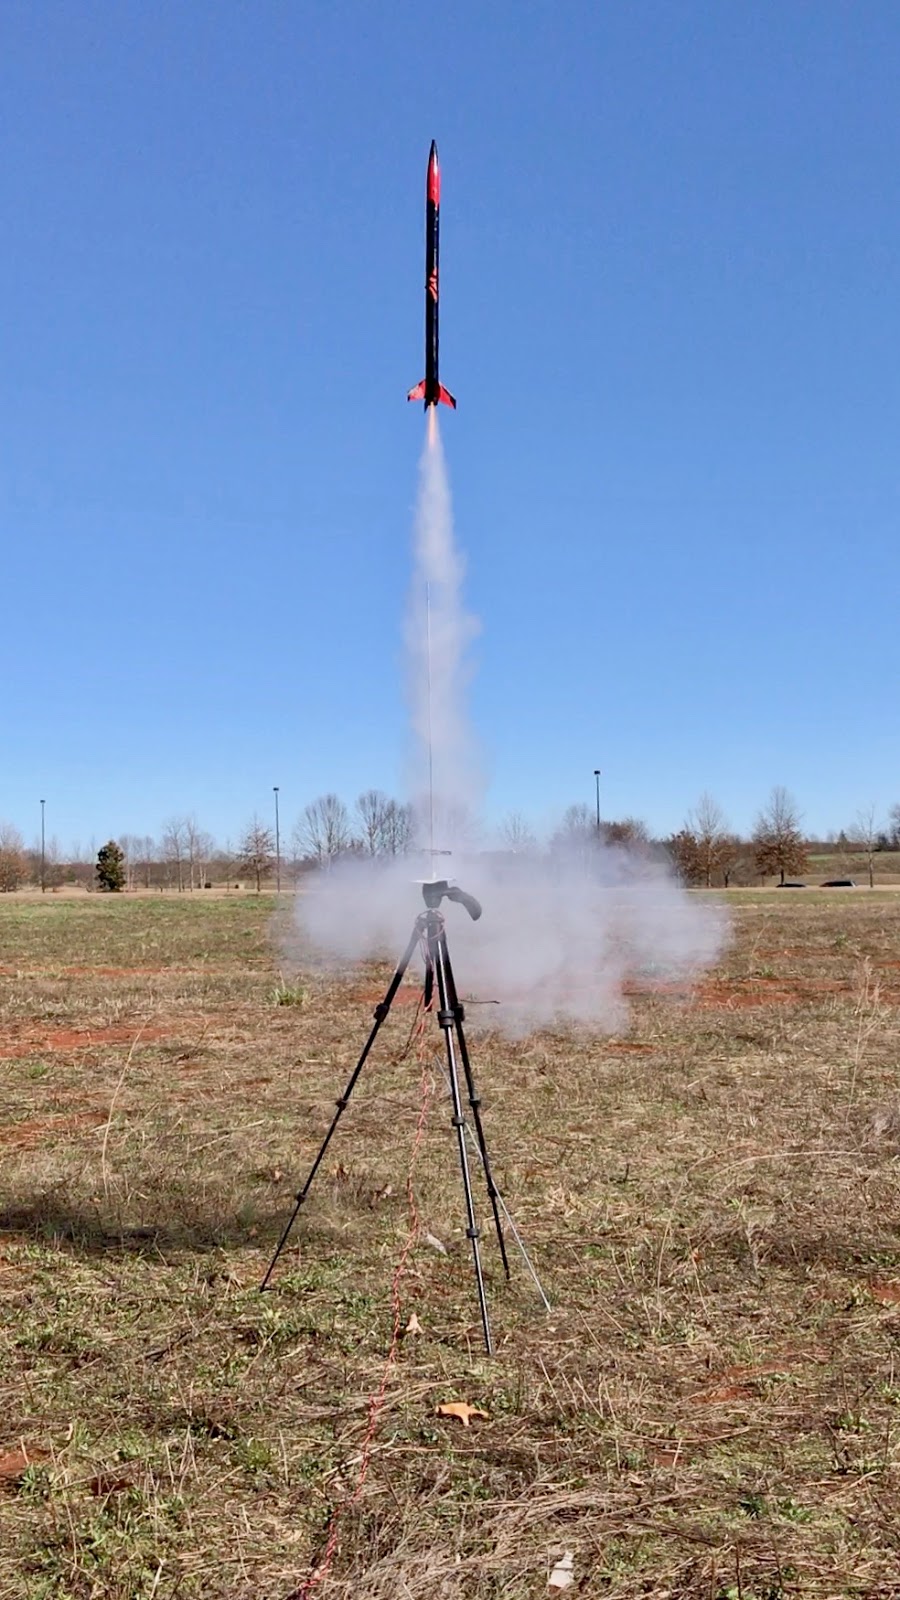
Noon today once again saw the start of more TARC practice and flying at Pegasus Field. The weather was a bit more favorable than last Saturday, with the temps in the upper 40's and a moderate wind out of the south-southeast. Jurassic TARC and the Falcon Rocketeers prepped their birds fairly quickly, with Jurassic TARC getting in 4 flights in just under 2 hours - a pretty good pace! 2 of these flights were decent, with altitudes around 830 feet and durations a few seconds off the mark; however, the rocket (Stars) flew squirrely on the last two, perhaps due to weights shifting within the rocket as it cleared the rod. A mystery for the Jurassic team members to contemplate - and fix - before the next practice.

Stars lifts off on its first flight of the day
(Click to enlarge).
Falcon's rocket explodes in an E motor CATO
(Click to enlarge).
Unfortunately, the Falcon team once again experienced the hard consequences of Murphy's Law. The Aerotech E reload powering their rocket exploded seconds after leaving the rod, spectacularly scattering pieces of the rocket bottom across the sky. This ended their practice for the day, and I felt sympathy for them as they packed up to leave. The rocket gods of TARC are indeed cruel, inflicting even the best of teams with occasional  misfortune.

We had quite a crowd at the field today - in addition to the two TARC teams, Duane, and myself, Allen, Marc, and Vince all came out to fly. There were also spectators - two interns from the propulsion group at MSFC (who got mucho information on the ins and outs of low powered rocketry), a friend of Allen's, and married friends of mine from undergraduate school, who brought three of their grandkids (dang, I'm getting old!). A friend of Duane's, Dave, also showed up with a bag o' rockets. Initially somewhat reluctant to fly, he was soon caught up in the action and put three rockets in the air - a Patriot, an Estes NSA Starship, and another one I cannot remember. The rockets were being prepped and fired quickly, and I couldn't pay attention to every flight as I worked on my birds. That's a good thing - busy pads are an indicator of a good launch!

Dave's NSA Starship clears the rod on a C motor
(Click to enlarge).
Dave's Patriot looking all pretty on the pad
(Click to enlarge).
It was nice to see Vince at the field, especially given that he FINALLY brought out his Geezer TARC rocket for its flight. Only 6 months late, but hey, better late than never. In true Vince fashion, it was a Frankenstein, bashed together from various kit pieces. The single D12 powering it was not quite enough, as the model topped out a bit over 500 feet; however, both sections landed safely, putting Vince's score on par with the performance of the former Geezer TARC champion, Duane. Vince also launched his Estes Sprint XL and Wac Corporal on flawless flights into the blue sky.

Vince proudly shows off his Geezer TARC rocket
(Click to enlarge).
Vince's Sprint XL gets started on an Estes D12 motor
(Click to enlarge).
Allen also had a few birds to fly; first up was his Estes Amazon on a B motor, followed by a Magician on a D12. He dropped the impulse down a bit to fly his Sonoma (an Estes Sequoyah with a butchered decal) on an A10, then made good use of his Jolly Logic Chute Release on his Redstone and Patriot rockets. Unlike last Saturday, the Redstone flight went well, even if the escape tower was missing - hooray for Estes C6-3's! He ended the day with a launch of his golden Estes Crossfire.

Allen launches his Amazon (Click to enlarge).Allen's Sonoma rides the A10's flame into the sky
(Click to enlarge).
It's always fun to see what Marc brings to the field. Of today's four, only one (an Estes Flip Flyer) was a kit; the other three were scratch builds. His first launch involved a blue and silver futuristic fighter type rocket, which did a little dance in the sky. The second flight was that of the Flip Flyer, which has the nose recover by parachute while the sustainer helicopters in on its rotors. Next was a 3 fin orange and gray rocket, featuring pods next to the fins - I should have asked his son for the rocket names, as I am sure they have all been christened. The final flight was that of a fairly conventional 4 fin rocket in a purple and pink paint scheme (probably inspired by his daughter). It flew well, except that it dragged the clothespin that was being used as a standoff up with it! Apparently the clothespin was caught on the engine hook, and I was lucky enough to capture a few frames of the action.

Marc's fighter scratch build awaits launch
(Click to enlarge).
Another Marc design takes to the air (Click to enlarge).
Marc's purple and punk rocket drags the standoff clothespin up the rod (Click to enlarge).

Duane was not to be left out of today's action - he flew his Estes Mega Mosquito on a D12, and his orange and green Geezer TARC rocket on an Aerotech F32, the noise and flame of which greatly impressed my friend's grandchildren.

Duane's Mega Mosquito on the pad (Click to enlarge).And clearing the rod (Click to enlarge).
As for me, I flew 4 - my Shrox Bolero, the Zooch S.D.L.V., my new Estes Challenger-1 clone, and an Estes Big Bertha with a keychain camera strapped to the side. The first three birds were powered by B motors, whereas the Bertha had a C6 stuffed into her to compensate for the weight of the camera. I was not as lucky as on past launches, for 3 of the rockets sustained minor damage. The shock cord of the Bolero snapped, leaving the nose attached to the parachute and the sustainer tumbling to the ground. Fortunately the nose cone landed within the field, and the sustainer fell on soft grass with no damage - the only repair required is to replace the shock cord. The Challenger-1 flew great, but had the top of the body tube smashed in a bit by the kid recovery crew - a typical result with enthusiastic young ones, one that is easily repairable. The Bertha landed on the asphalt of the road, chipping the bottom of one of the fins. This too can be fixed.

The Shrox Bolero is ready to go (Click to enlarge).Ignition of the B6 motor in the Challenger-1.
Duane's Geezer TARC rocket is in the background
(Click to enlarge).
Big Bertha lumbers off the pad on a C6
(Click to enlarge).
Captain Jack of the Falcon Team hooks up his Estes
Farside (Click to enlarge).
It was quite the busy day at Pegasus Field - I'm looking forward to more like it!

Saturday, January 28, 2017

Cold and windy...

Jurassic TARC readies Stripes for launch (click to enlarge).
Duane and I linked up with the Jurassic TARC team around 11 this morning - it was a chilly day, with temps in the low 40's, made even colder by a sustained 10 mile per hour wind out of the west-southwest. However, young people are quite hardy, and Jurassic TARC was determined to get in about 6 practice flights despite the cold.  I hate cold, so I watched them ready their "Stripes" rocket from my chair next to Duane's SUV, which I used to shield my carcass from the wind. In about 40 minutes, the bird was prepped and loaded on the pad, eager to blast off on its Aerotech E15 motor.


Turns out that the E15 was a bit too much - Stripes shot off the pad to over 960 feet, and the stiff wind carried the rocket very quickly to the east, outside the bounds of Pegasus field. The payload section containing the egg and altimeter was recovered; unfortunately, the lighter sustainer stayed aloft on its parachute for quite a bit longer, drifting beyond the line of trees on the east boundary of the field across the road. After a long search, it was given up for lost, and Jurassic TARC decided not to risk "Stars", their second rocket. Temporarily defeated by the wind, they decided to call it a day. The Falcon Rocketeers began arriving as Jurassic TARC was packing up; upon hearing the fate of Stripes' bottom, they too decided to waive off on their practice flights.

But the day's flying was not done. While Jurassic TARC was out searching for Stripes, I did the final prep on my Centuri RX-16 clone, which was the only rocket I brought to the field. It was "fully instrumented" - HD keychain camera strapped to the side, with the tiny Micropeak logging altimeter and Jolly Logic Altimeter Two loaded into the payload bay. This was a fair amount of weight, and I figured the C6-3 motor would not loft the model very high, which I regarded as a good thing given the wind. My expectation proved right - the RX-16 lumbered off the pad, straining to get some altitude. The parachute deployed just fine, and the model landed on the grass about 30 yards from the pad.


Other rockets would take to the air. One of the TARC team captains launched a naked Alpha on an A8-3, and Marc launched the "Alpha 5" - a rechristened Estes Make-It-Take-It - a couple of times on the same motor type. Allen put up his gold Crossfire, an Estes Amazon (the one with the "snake skin" finish due to crazed clear coat), and his Patriot with its unique decor. The most spectacular flight was made by his Mercury Redstone, which was loaded with an Estes altimeter and powered by a Quest C6-3. It did a little dance in the air and arced right into the ground; I felt great sympathy for Allen as he dug pieces of the escape tower out of the soft earth.

Allen's Crossfire leaves the pad (Click to enlarge).Allen readies his Mercury Redstone (Click to enlarge).

Marc and son hook up the Alpha 5 (Click to enlarge).The Alpha 5 streaks upward (Click to enlarge).


The Amazon lifts off (Click to enlarge).Allen's Patriot starts up the rod (Click to enlarge).

After a couple of hours, the wind-enhanced chill was getting a bit much, so we packed up and headed to our homes. Back in my warm apartment, I downloaded the data from the Micropeak and compared it to the results from the Altimeter Two. Looking at the table below, you will notice that the peak altitude, max speed, and time to apogee (boost + coast) are in pretty good agreement. However, the accelerations differ by quite a bit  - I am inclined to believe the Micro Peak values, as 7+ g's max acceleration is a bit hard to swallow given the relatively slow liftoff of the RX-16. I attribute these discrepancies to the algorithms used to calculate the acceleration from the altimeter data.

Altimeter data comparison (Click to enlarge).
The difference in descent rate and total flight time bothered me the most. However, a study of the plot of the Micropeak data has provided reasonable explanations. It clearly shows that the descent rate is not constant, starting out around -18 feet per second and slowing to around -12 feet per second at landing. There is a fair amount of fluctuation, so perhaps the difference in algorithms produced the different values. The shorter flight time reported by the Micropeak can be partially explained by the fact that landing is reported as having occurred at -4 feet. It appears that the Micropeak set zero altitude to correspond with the blast deflector on my tripod launcher, which is about 3 feet off the ground; it reported the total time to return to this level, which is higher than the actual ground. The Altimeter Two seems to calculate differently, as its time corresponds to actual contact with the grass. At 12 feet per second, it will take 0.33 seconds to fall the additional 4 feet - close enough to the reported difference.

Micropeak altimeter data for RX-16 flight (Click to enlarge).
With my rocket and data fixes satisfied for the day, I now am ready to watch the science-fi B movies on Svengoolie tonight.

Monday, January 16, 2017

Measuring the thrust of rocket motors...

I had some spare cash a few months back, which enabled me to fulfill a goal I have had since a kid - build an experimental setup to measure the thrust curve of rocket motors. I have wanted to do this since I saw articles on thrust measurements in rocketry magazines and catalogs (see this one from the 1966 Rocket Development Corporation catalog), and it was finally time to drain the bank account - er, I mean, take the plunge. So I did the usual googling and came up with a system consisting of parts from Vernier:
All-in-all about 600 bucks of stuff. It turns out I didn't really need the Logger 3 software, which would have saved a couple of hundred, but it sure is a nice to have. I placed the order and the gear arrived within a week; I have to commend Vernier for their excellent customer service, as they not only shipped quickly but also responded very fast to my inquiries about how to make a personal, non-education purchase of their products.

The next step was to incorporate the force sensor into some sort of test stand. I suck at building such things, so I turned to the able engineer Duane, who whipped me up a fairy nice contraption in a couple of days:

The motor test stand, engineered and built by Duane (Click to enlarge).
You will note that the force sensor has a toggle allowing you to switch sensitivity from 10 newtons full scale to 50 Newtons. Most LPR rocket motors have peak thrusts near or exceeding 10 newtons, so I anticipate operating with the 50 newton setting practically all the time. The motor tube is 24 mm inside diameter, and you can see a red plastic Estes 18/24 mm adaptor sticking out of the top. The motor is placed in the tube, and fires straight down towards the ground, thereby minimizing the risk of the stand moving around. Got to work on the motor retention at ejection though.

The test stand plugged into the LabQuest2 unit. This is all I need to measure the thrust curve of a rocket motor
 (Click to enlarge).
The force sensor connects straight into the LabQuest 2 unit, which does the data recording. It also does a heck of a lot else, such as serve as a wireless hub to stream the data out on a local network to computers and tablets (there are free apps for those), enabling a bunch of people to participate in the experiment. It can also analyze the data and send the results out by email or SD card. I have not even begun to unravel all the functionality, but it was easy enough to figure out how to zero the sensor, take data,  and send it out to my computer. I'm sure I will discover many new things as I gain experience with the unit, which appears to be much smarter than me.

Since I have a ton of Estes A8-3 motors, I figured Saturday's TARC practice launch would be a good time to make some thrust curve measurements. After I finished flying my rockets, I loaded an A8-3 (with igniter) into the motor tube, connected the launch controller and the LabQuest 2 unit, and placed the test stand on the ground. I set the LabQuest to record measurements for 10 seconds at 50 samples per second - I wanted to catch the ejection charge, to see when it occurred after motor burnout. As the count from 5 progressed, I started data recording on the LabQuest and saw the following plot appear as the motor fired:

LabQuest2 screen capture showing the thrust curve of an Estes A8-3 motor. The sharp spike near the end
is the motor ejection charge (Click to enlarge).
Success! I happily loaded a second A8-3 (from the same pack) and repeated the process; I would have made more measurements, but it was approaching 2 PM and my stomach was telling me I had missed lunch. However, upon reaching my apartment, I quickly transferred the data from the LabQuest2 into my mac, whereupon the fun with numbers commenced. I discovered that I could use the Logger 3 software to replay the measurement run:


and zoom in on the motor thrust curve, at which point I could tell the software to integrate the area under the curve to get the motor's impulse (2.12 newton-seconds):

The Logger 3 software can integrate the thrust curve to derive the motor impulse (Click to enlarge).
Once you have the impulse, the average thrust is simply the impulse divided by the burn time of the motor. After I had analyzed the data from both motor firings, I then created a plot comparing the measured thrust curves to the published NAR test results (from 1995). As expected, the measured curves are similar - after all they are from the same box, with the same date code (A011216). However, they differ a bit from the NAR average curve, leading me to wonder if the A8's have changed a bit over time. The difference is not much, but noticeable. You will also note that the A8 is no such thing - it has a tad over 3 newtons average thrust, not 8. It should be labeled A3.

Thrust curve comparison (Click to enlarge).
Finally, here are the results in tabular form. I'm looking forward to making more measurements!!!!!

A8-3 thrust test results (Click to enlarge).

Saturday, January 14, 2017

1st launch of 2017...

A coupe of days ago, Duane informed me that the Pope John Paul II TARC teams (Falcon Rocketeers and Jurassic TARC) would be making their first practice flights on Saturday. This made today not only a time to observe these two teams, but also a golden opportunity to fly a few of my birds and perhaps try something new. And so 11:45 saw a small pile of stuff just outside my apartment door - the usual range gear, a few rockets, and my small motor test stand, ready to make its first measurements of rocket motors.

The "Black Pearl" heads up the rod in a spectacular fashion. Image
taken by one of the Falcon Rocketeers (Click to enlarge).
The Falcons and Jurassic TARC had a good turnout today, with practically all team members showing up in the unseasonably gorgeous weather (temps in the high 60's, light to moderate wind out of the southwest). Each team made two flights - Jurassic TARC put up their "Stars" rocket once, followed by its mate, "Stripes". Falcon brought only one model - the "Black Pearl" - which flew twice. Based on what I heard, all flights were at least 100 feet over the altitude mark, resulting in way long durations. However, this is a good thing - it is easier to lower altitude than to try to gain more, as the latter usually involves hacking off parts of the rocket. It was a good way to start the practice season, and I was encouraged by the teams' performances and attitudes. I have no doubt their next flights will be closer to the goals.

Some Falcons unpacking gear as Jurassic TARC preps "Stars" in the background (Click to enlarge).
The Falcon Rocketeers ready the Black Pearl for flight (Click to enlarge).
The nice thing about low power is that it is quick to set up and take down - Duane and I already had a few flights in before the first TARC rocket took to the sky. I was first, flying my Estes Generic on an A8-3. It is a bit dressier when compared to its appearance in my last post, as I have added barcode and net weight decals to the rocket, based on comments. So it is now even truer to the generic style, and proved it by putting in a generic flight. A classic followed my Generic - Duane's favored Cherokee-D, which was powered by an Estes C6-5. Can't really blame him for sticking to 18mm motors, as a D12 would easily put this baby way up there and drifting far beyond the confines of Pegasus Field.

My Generic is ready for launch (Click to enlarge).Duane's Cherokee-D lifts off
(Click to enlarge).
Santa took advantage of the weather to fly in the "Polar-1", but the old boy must have eaten too many cookies in his Christmas travels, as the rocket struggled to make altitude on an A8-3. I'll up the sleigh's power to a B motor next time he flies. Duane's BMS School Rocket was next, looking very patriotic as it slowly lifted off the pad on an Estes E9 motor

The Polar-1 clears the rod (Click to enlarge).Duane's School Rocket on an E9 (Click to enlarge).
It was then time to launch my newly-built Mars Snooper, which was finished on New Year's Eve, barely in time to commemorate the 50th anniversary of the kit's release. It flew straight as an arrow on a B6-4, descending to a soft landing on the grass north of the pads. Unlike the Titanic, the Mars Snooper survived its maiden voyage. My final flight of the day was an Estes ARF (Almost Ready to Fly) Helios, outfitted with the optional booster and my new HD keychain camera. It shot off the pad on a C11; staging was nominal, with the sustainer continuing upward on a C6-5. The Helios landed to the south of the pads, and I was crossing my fingers in hopes of getting good video of the staging. I got lucky this flight, as you can see from the video below.

My Mars Snooper clears the rod on its first flight (Click to enlarge).
The Helios gets moving on a C11 (Click to enlarge).
Helios staging sequence in slow motion

Duane still had a couple more rockets to launch. He loaded up his old champion TARC bird, "The Beast" with an ancient F Black Jack composite. The bird left the pad trailing more smoke than a 60's smokestack. The final flight involved his Estes Leviathan, which rocketed off the rail on an F52; it snapped a fin on landing, the only casualty in the non-TARC flights. I accidentally obtained an interesting shot of the blast deflector glowing blue while being hit by the F52's exhaust. very unexpected and very cool!

The Beast rides a plume of black smoke into the sky (Click to enlarge).
The blast deflector glows blue as the F52 begins to push the Leviathan upward (Click to enlarge).
In the pic of the Falcons prepping the Black Pearl (why is it half red?), you might have noticed a strange contraption on the table. That's my small motor test stand, which will be the subject of the next post.

Friday, December 23, 2016

True-to-the-name Estes Generics...

Duane recently dropped off the remaining Make-It-Take-It kits from the October Rocket City Blast Off; while in the process of putting them away, I discovered a poorly built Estes Generic buried in the pile. The pathetic thing had a loose fin can, and you could practically hear it screaming "Fix me! Make me worthy to fly!"

So I did...

I re-glued the fin can, filled the spirals with diluted Fill N Finish, filleted the launch lug, and applied two coats of primer. While the last coat was drying, I contemplated what to do with this almost ready to fly (ARTF) Estes model - the standard paint scheme involving the "peel n' cuss" stickers was abhorrent, and I found myself taxing my single creative atom in an attempt to come up with a simple décor that would match the rocket name. After an hour or so of banging my head against the wall, I did what I should have done in the first place - scan the Internet.

Which brought me to a superb blog - Blast from the Past - by Edward Mitton. In a strange cosmic coincidence, he and I were struggling with the same conundrum at roughly the same time. However, Edward obviously has some creative chops, for he came up with a simple and very obvious solution that I can only ascribe to a flash of creative genius.

Paint the rocket white like a generic package, with the appropriate label.

So simple, yet so inspired. I had to create a Generic for myself.

And here it is, with the waterslide decal label. I changed the wording a bit, but the gist is the same as on Edward's model.

My version of the Generic (Click to enlarge).
A closer view of the label (Click to enlarge).
Now THESE are true Generic rockets.

Paying attention, Estes?

Thursday, December 22, 2016

What to do on a rainy day...

From a rocket perspective, rainy days kinda suck - can't launch, can't paint, can't sand. You can start a kit build, but have to stop at the sanding parts - not very satisfying, unless you are putting together something with plastic or fiber fins. These go together in like 30 minutes, leaving quite a few hours needing something to do. Such was the situation this past weekend, and I found myself online searching for a subject for my next build (yeah, I know I have a list, but that's for 2017, which ain't here yet). Glancing away from my monitor, I noticed the Centuri Stellar Hercules clone over in the corner, and I realized that it was high time I built another in the old Stellar series. A few seconds later, I was perusing the Centuri catalogs - I did not like the looks of the Loadlifter, a payloader with a minimum diameter main body tube. The engine hook was on the outside, held in place by a mylar ring, which seems a bit on the tacky side. However, the Stellar Photon Probe was a different beastie - it exhibited a futuristic style, with two part fins and reactor vanes. Classic Centuri... So classic that Estes later adopted a simpler version of the design in their early 1990's Solar Probe model.

The 1970's Centuri Photon Probe and the 1991 Estes Solar Probe
(Click to enlarge).
Before starting any clone build, one must first make sure one can actually build it. This entails searching the Net for plans, parts lists, and decal scans. The plans were easy, as they were located on Ye Olde Rocket Plans, the best source of rocket instructions after JimZ's site. The parts list was more difficult, as the instructions did not specify the part numbers; fortunately, there were a couple of threads on Ye Olde Rocket Forum (my favorite hangout) devoted to this model, and these listed the parts. A quick comparison of this list against my inventory showed I had all the parts needed for the build, including the laser cut fins (Thank you Semroc/eRockets!).

Which left the decals...

They were nowhere to be found - no scans anywhere. The authors of the YORF threads had whipped together their own based on the cover art and kit instructions (which were not in agreement, by the way). I was going to have to do the same, so I pulled out my ruler and started measuring the dimensions of the markings on the model's screen images relative to the body tubes and fins. Once I had these numbers, I fired up the Pixelmator software on my Mac and got to work. It turned out that I did not need to draw everything, for I had some of the markings in scans of other decals. In the end, I only had to create the bottom roll pattern, the numbers, a few lines, and the "NASA" and "United States" markings. The upper roll pattern came from the Centuri roll pattern decal sheet and the hatches were obtained from a scan of the Estes Solar Probe decals. Thus, after about an hour and a half of effort, I had a fairly reasonable reproduction of the Stellar Photon Probe decals.

A few hints for those of you who wish or need to make your own decals:
  • Always scan your kit decals - you never know when you may need to reproduce them for a repair or use them on another model.
  • The convention is 300 dpi resolution - use this when scanning decals and in creating the canvas in your art program. Also helps to place a ruler in the scan to confirm the dimensions.
  • I also set the canvas size to that of a standard 8.5 x 11" sheet of decal paper, so I can tell how much space will be occupied. Any free space is filled with other kit decals or markings, maximizing the use of the paper.
  • If using an ink jet printer, be sure to spray a clear coat on the decal sheet after printing to avoid smearing when they are applied. My HP Envy inkjet sucks at decal printing, so I use Bel decal paper for laser printers and print them out on the office color laser. No need for the clear coat and the quality is acceptable.
Below is my decal sheet for the Stellar Photon Probe, which also includes a scan of the Estes Challenger 1 decals and some markings for a Generic kit bash. I also show a decal sheet created by PaulK on YORF, so you can see the differences in interpretation. I followed the plans more than the kit art, whereas he did the opposite. No right or wrong here, though I do wish someone would post a decal scan from an original kit. Trouble is that these Stellar kits are fairly rare, and it's hard to imagine a collector opening a pristine box just to provide some rocket noobs a scan of the decals.

Paul's decals posted to YORF (click to enlarge)My decal page (Click to enlarge).
The build can now commence...