Sunday, January 31, 2016

Testing the Jolly Logic Chute Release

A few months back John Beans at Jolly Logic announced he was working on a new product - a device that could release a parachute at a specified altitude without using explosive charges, called the Chute Release. He posted updates on his progress to the Internet, and I found myself keenly interested - I'm all over anything that reduces the distances I have to schlep to recover rockets. Ergo, when he announced the product's availability, I promptly went to the Jolly Logic web site and ordered one. It arrived in about 3 days, packaged in a slick-looking box. The arrangement of components inside the box was just as slick, with everything neatly organized and labeled.

The Chute Release works as follows - a rubber/elastic band is wrapped around the parachute and connected to an altimeter-controlled device which releases the band at a set altitude. It's very, very easy to use - you simply press a button to set the altitude (in 100 foot increments), and there is a setting for testing the parachute release, to make sure the chute comes free cleanly. The Chute Release is a bit on the hefty side at 0.6 ounces, and you would be hard-pressed to fit it in anything smaller than a BT-60 body tube, but these are not significant negatives. The device charges via a standard USB connector, and my first tests caused me to salivate at the thought of using it in a 2 stage Estes Omega loaded with D12's or even E12's - I could deploy the parachute at 400 feet or so and save myself a lengthy hike. Perfect for an old, chubby rocketeer!
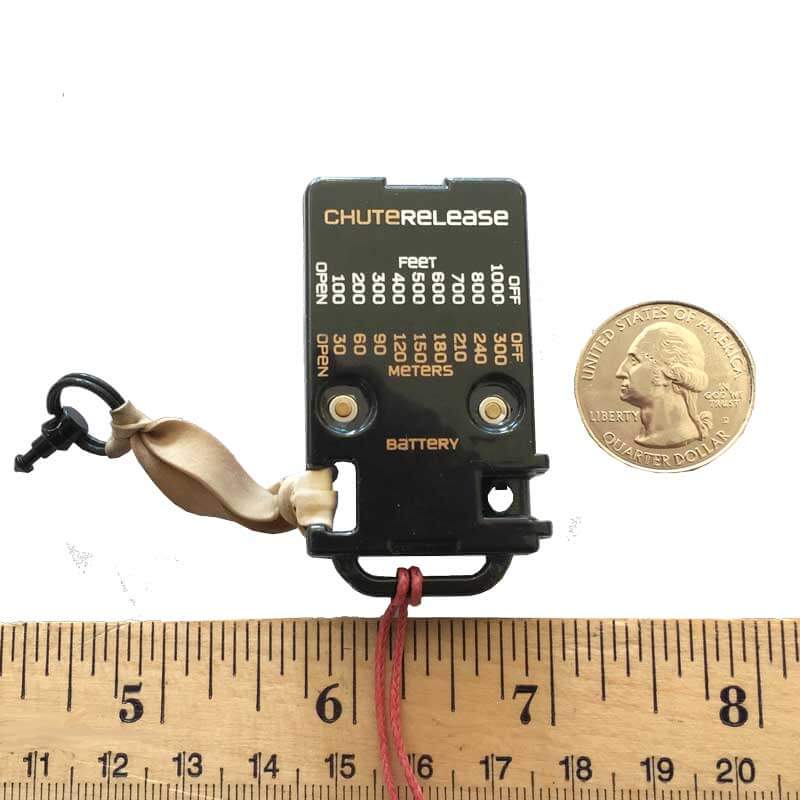
The Jolly Logic Chute Release (Image from the Jolly Logic website).


John Beans explains how to operate the Chute Release

Saturday I prepped my trusty clone of the Centuri RX-16. This rocket, part of the old Centuri Power System, was an appropriate choice, as it is based on a BT-60 (actually, ST-16) tube and was marketed as a "science testbed"; peak altitude was determined by timing the fall of a ping pong ball kicked out by the rocket at parachute ejection. It also featured interchangeable motor mounts, and the afternoon's flight used the single 24 mm mount, loaded with an Estes D12-5. I had to go with the D12, as the RX-16 would also carry a keychain camera in an attempt to image the deploy; this adds another 0.5 ounces of weight, on top of the additional 0.6 ounces of the Chute Release. As mentioned in my previous post, a tiny Altus Metrum altimeter was loaded in the payload section.

Clone of the Centuri RX-16 (Click to enlarge).
Following the instructions, I attached one of the small rubber/elastic bands to the Chute Release, which was then tethered to the shroud lines of an 18" rip stop nylon parachute. I had to practice rolling up the parachute a couple times before I was able to get a nice, tight bundle; once this was done, I wrapped the band around the parachute and slid the Chute Release/parachute combination into the sustainer. I was please to see how loose the combo was in the ST-16 sustainer body tube. After arriving at the field, I performed another release test, repacked the parachute, and set the Chute Release to deploy at 300 feet, as the instructions recommend allowing 50-100 feet for the parachute to unfurl.

The RX-16 was the first one launched Saturday. It quickly lifted off the pad, arcing into the strong southern wind; ejection occurred a couple of seconds after apogee. I held my breath as I watched the model fall, the parachute fluttering behind, held closed by the Chute Release. I began breathing again when I saw the bright orange canopy open wide at about the right height, and the model descended to a safe landing on the grass. Success! All that remained now was to look at the data, which I did as soon as I got back to the apartment. The altimeter data and video were downloaded to my Mac, and I then proceeded into Nerd analysis heaven.

The altimeter data was first up - It showed the RX-16 achieved an altitude of 542 feet, with ejection occurring 2 seconds past apogee, at 7.8 seconds into the flight. The descent rate abruptly changed from 36 feet per second to 16 feet per second 14.1 seconds into the flight, indicating that the parachute had fully deployed. This happened at an altitude of 260 feet, some 40 feet below the 300 foot altitude programmed into the Chute Release. A look at the video placed ejection at frame 371, and the Chute Release was clearly separated from the parachute at frame 526, 4.65 seconds after ejection. This suggests the Chute Release let go of the parachute about 12.4 seconds after launch, at which time the somewhat noisy altimeter data gives a height of 325 feet. It then took about 1.7 seconds or 60ish feet for the parachute to fully open - in good agreement with the instructions.

RX-16 flight summary (Click to enlarge).
RX-16 altitude profile (Click to enlarge).
Parachute held closed by the Chute Release (Click to enlarge).
Unfurled parachute and the Chute Release (Click to enlarge).
So there you have it - the equivalent of dual deploy in a model rocket without the need for explosive charges. Absolutely awesome! This little device opens up a whole realm of possibilities, and I'm going to be using it a lot.  My only gripe is that John Beans has now eliminated my last excuse for not building an Estes Omega clone...

Time to break out the wallet, rocketeers. Find a vendor on the Net, and buy one!


Saturday, January 30, 2016

The rocket's perspective...

Rocket videos go by so fast in real time; it takes stepping through frame by frame to uncover the neat stuff. I really liked the onboard video from today's RX-16 flight - the colors reminded me of the old Cineroc movies. So here are a few frames from that video; I hope you enjoy them!

Near apogee (Click to enlarge).
A few frames later (Click to enlarge).
Looking down the tube at the moment of ejection (Click to enlarge).

The sustainer against the blue of the sky (Click to enlarge).
The parachute canopy (Click to enlarge).
The Jolly Logic Chute Release up close and personal (Click to enlarge).

Finally flying after a hiatus of a couple of months...

It would seem that no matter how much I try to practice moderation in my hobby, I end up burning out. I pretty much stopped doing rocketry-related things around Thanksgiving, and am just now reviving my enthusiasm for flying and building. Flying is easier, so that's what happened today. The building will recommence soon - I still have one rocket in primer and two on the bench, all three of which are clamoring to be finished.

Today was sunny and comfortable, with temps in the mid-60's. It would have been perfect, except for the wind out of the south, which was a blustery 10 to 15 mph. However, that did not discourage me from flying a few - after all, windy days are why we have the lower impulse motors. Also, the two Pope John Paul II teams - Jurassic TARC and Falcon Rocketeers - were going to be out practicing and I wanted to take a gander at their progress.

Marc's rocket streaks upward on a B6 motor (Click to
 enlarge).
Vince's rocket leaves the pad (Click to enlarge).
Duane picked me up and we moseyed over to Pegasus field; the TARC teams were getting set up, and Marc, Vince, and Woody would soon join us under the sunny blue sky. Vince put up a couple of Estes kits, and Marc - who was accompanied by his kids - also launched a few. Woody's rockets were loaded with C motors, and he wisely decided not to fly them, as they stood a significant chance of ending up in Oz. Today's flights were notable not for height, but for the fact that the wind caused them to drift a distance greater than their altitudes. It was sufficiently strong that the TARC teams packed up after Jurassic TARC's yellow rocket did a severe turn into the wind right after leaving the rail. Not much point in practicing under conditions like that. A very short TARC practice!

Jurassic TARC's rocket acts into the wind (Click to
enlarge).
My Sizzler blasts off as Jurassic TARC looks on
(Click to enlarge).
I launched three birds - my Centuri RX-16 clone on a D12-5, the Estes Sizzler clone on an A8-3 (maiden flight), and the Aerospace Specialty Products NEO Standard on an A8-3. The Sizzler and the NEO were incidental flights; my focus was on the RX-16, which was flying to test the Jolly Logic Chute Release I received this past week. This rocket was instrumented to the max - not only was the Chute Release attached to the parachute, but I had loaded my MicroPeak recording altimeter into the payload section and strapped a keychain video camera up near the nose in the hopes of getting some good footage. I had considered using the Jolly Logic Altimeter 3 to send altitude data to my phone, but decided in favor of the much lighter MicroPeak to keep a thrust to weight ratio of 5 to 1 - very important on windy days.

The NEO Standard leaps for blue sky on an A8-3 (Click
to enlarge).
The instrumented RX-16 starts its test flight (Click to
enlarge).
All three flights went very well, though I did pause a bit when it looked like the NEO was going to drift into the middle of the road. Fortunately, the wind let up just enough to permit a landing on the grass at the near edge. Here's the video from the RX-16 flight; you can see that it was truly a nice day to be outdoors.


I will give more details on the RX-16 flight and the performance of the Chute Release in my next post. But I would like to end with a shout out to Perfectflite, who repaired my damaged PNUT altimeter free of charge. They are truly a class act, and it is no wonder their electronics are widely used within the rocket community. My sincere thanks to them!