Saturday, February 28, 2015

Winter Doldrums

Weather this month has positively sucked - bitterly cold and marked by freezing precipitation. This past week saw a major snow event; Huntsville received 8 inches of snow in a single day! Fortunately, the snow did not last long, but the lack of sunshine this month has put me into a kind of funk. I'm not in the mood to do much of anything besides sleep and go to work. However, there was some sun today, which provided an impetus to do a little in the way of rocket construction.

From left: Beulah, Big Bertha, and a clone of the Canaroc Green Hornet,
seriously in need of sanding and a second primer coat. In front of the 
rockets are some of the parts to a Centuri Micro-Probe clone.
Big Bertha and Beulah are built, and the filling of the fins has started on Bertha. As you can see from the image, Beulah looks a lot like her sister, except that she is a little taller with a payload section for altimeters and such. She also features interchangeable motor mounts (same setup as found in the Centuri RX-16), which enables flights on single or dual 18 mm motors, or a single 24 mm if I am in the mood to send her really flying. To make prepping easier, I installed a baffle, eliminating the need for parachute wadding. Now all I have to do is decide on a decal/paint scheme - anyone got a suggestion? Should be appropriate for the rocket's name - what would a Beulah look like?

The Big Bertha is an original kit from the late 1970's. I even used the balsa "die-crushed" fins, which were in surprisingly good shape after 40 years. She will probably receive the standard yellow and black decor of that decade.

Page from 1979 Estes catalog showing Big Bertha paint scheme.
I have also started work on the clone of the Centuri Micro-Probe. A 2 stager in the classic Centuri style, this little rocket last made an appearance in the 1971 catalog. Never had one as a kid, but Semroc parts make it fairly easy to replicate, even with the unusual diameter of the clear payload tube. Today, I cut the body tubes and the payload section to the appropriate lengths and the booster fins have been assembled and are drying. Hopefully tomorrow evening will see the rocket assembled and ready for fin fillets.

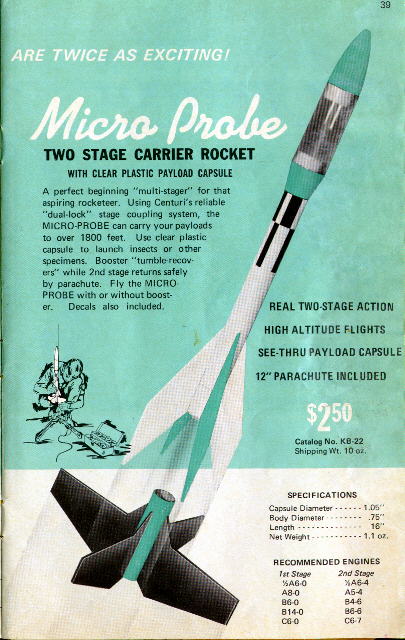
Micro-Probe featured in the 1969 Centuri catalog.
Assuming we don't get any more stupid snow.

Sunday, February 1, 2015

A bit about altimeters...

I love modern electronics - stuff that was impossible in the 1970's is now not only doable, but cheap. This is especially true with rocket payloads - we now have gps and radio trackers, flight computers, and small altimeters, just begging to be shot into the big blue sky. I haven't got into the trackers and computers - yet - but I have assembled a collection of barometric altimeters over the years, in part because of my involvement with Team America Rocketry Challenge (TARC) and partly because I like to know how high my rockets go. These altimeters range from $25 to $150 in cost, and fall into one of two categories:
  1. Peak altimeters - These devices are active throughout the flight, but lack the memory to produce a detailed flight profile. The simplest ones just beep or flash the peak altitude; more elaborate models will display other information, such as average speed, time to apogee, acceleration, and so forth. Examples of this class include the Jolly Logic Altimeter One and Two, the Estes Altimeter, and the PerfectFlite Firefly and APRA (The latter is an approved altimeter for this year's TARC competition).
  2. Recording altimeters - These devices store information throughout the flight, usually at 0.1-0.2 second intervals. This data can be downloaded into a computer or other device, where it can be displayed and/or manipulated. Cheaper ones store data for only one flight, forcing you to download the data almost immediately if you wish to fly it again during a launch; others can store data for many flights, eliminating the need to bring your laptop to the field. Examples are the Jolly Logic Altimeter Three, the Altus Metrum MicroPeak, and the PerfectFlite PNUT (the other TARC approved altimeter for 2015).
Being a nerd, I swoon over numbers, so recording altimeters are my favorite. I love being able to adjust simulations to the profiles, which enables better determinations of drag coefficients and other things that give geeks delight. To paraphrase my colleague Joe Minow, "More data is good."

Some of my altimeters. On the left, starting at top: Estes Altimeter, PerfectFlite PNUT,
Jolly Logic Altimeter Three. On the right: Altus Metrum MicroPeak, PerfectFlite Firefly,
and the Jolly Logic Altimeter Two (pre 2014 version).
This year's Christmas present from me to me was a Jolly Logic Altimeter Three. I have been waiting months for this puppy to hit the market, as it downloads data to your smartphone, rather than using a USB cable connected to a computer. The MicroPeak's use of a flashing LED to transmit data to a USB adapter was cool and different, but the Altimeter Three is a new level of coolness - Imagine being able to control your altimeter inside your rocket from your phone? Plus the lack of annoying beeps, which had a not insignificant appeal.

Yesterday marked the first time I flew my Altimeter Three. Here are my initial thoughts:

  • The Altimeter Three (and the new Altimeter One and Two) is bigger than most of the others - it won't fit in a BT-20 tube, and is very loose in a BT-50. I found that a Centuri ST-8 (0.865" inner diameter) is a good fit, but you may have to make some custom rings to mount this inside an Estes body tube. Jolly Logic sells a snap mount to help attach the altimeter to a sled. Weighing in at 10 grams, the altimeter is also a little bit on the heavy side.
  • I like the change to a USB cable for charging the altimeter - a definite improvement over the pre-2014 Jolly Logic devices, which plugged straight into the USB port. They were way too easy to break.
  • The Altimeter3 app is currently only available for iOS. However, I just saw a note from John Beans saying that the Android version will be out this coming week, so don't let that stop ya from getting one.
  • The Bluetooth interface to the iPhone is a pain - John Beans, the man behind Jolly Logic, is pretty up front about this. Most of it isn't his fault, as Apple implements Bluetooth in a weird way (no big surprise). To help out, he provides a very good Bluetooth setup guide and I was able to get my connection up and going fairly easy. There was some funkiness reconnecting with the altimeter after the flight, but turning Bluetooth off and then back on solved the problem. Still, this was less effort than opening up the rocket and extracting the altimeter to listen to the beeps or watch the flashing LED.
  • The smartphone software is very good, and works as advertised. I was very pleased by the simple interface and the amount of data displayed - very nice to have available in the field! The ability to share data with your buds via email or social networks right after the flight is pretty darn nice, and I mucho like the well-formatted Excel spreadsheet that accompanies the email.

Initial screen of the Altimeter3 app -
You connect to and control the altimeter 
from this screen - set mode, start and stop
recording (Click to enlarge).
Flight Summary screen. The StrongARM is
a default within the app. Tapping on a flight
brings up more detail (Click to enlarge).
The flight information screen. The flight
name and any notes are entered here
(Click to enlarge).
The chart screen, with the time and altitude
of apogee marked. You can mark additional
points to highlight other features on the plot
(Click to enlarge).
Map screen. The app uses your phone's
GPS to locate the launch location, which
is displayed on the map (Click to enlarge).
Sharing screen. You can email your flight
data or share it on social networks from the
field (Click to enlarge).
Excel spreadsheet accompanying the Jolly Logic Altimeter Three email (Click to enlarge).
If you are looking for a hi tech, fun altimeter for your rockets, this is the one to get. Recommended.