Weather this month has positively sucked - bitterly cold and marked by freezing precipitation. This past week saw a major snow event; Huntsville received 8 inches of snow in a single day! Fortunately, the snow did not last long, but the lack of sunshine this month has put me into a kind of funk. I'm not in the mood to do much of anything besides sleep and go to work. However, there was some sun today, which provided an impetus to do a little in the way of rocket construction.
From left: Beulah, Big Bertha, and a clone of the Canaroc Green Hornet,
seriously in need of sanding and a second primer coat. In front of the
rockets are some of the parts to a Centuri Micro-Probe clone.
Big Bertha and Beulah are built, and the filling of the fins has started on Bertha. As you can see from the image, Beulah looks a lot like her sister, except that she is a little taller with a payload section for altimeters and such. She also features interchangeable motor mounts (same setup as found in the Centuri RX-16), which enables flights on single or dual 18 mm motors, or a single 24 mm if I am in the mood to send her really flying. To make prepping easier, I installed a baffle, eliminating the need for parachute wadding. Now all I have to do is decide on a decal/paint scheme - anyone got a suggestion? Should be appropriate for the rocket's name - what would a Beulah look like?
The Big Bertha is an original kit from the late 1970's. I even used the balsa "die-crushed" fins, which were in surprisingly good shape after 40 years. She will probably receive the standard yellow and black decor of that decade.
Page from 1979 Estes catalog showing Big Bertha paint scheme.
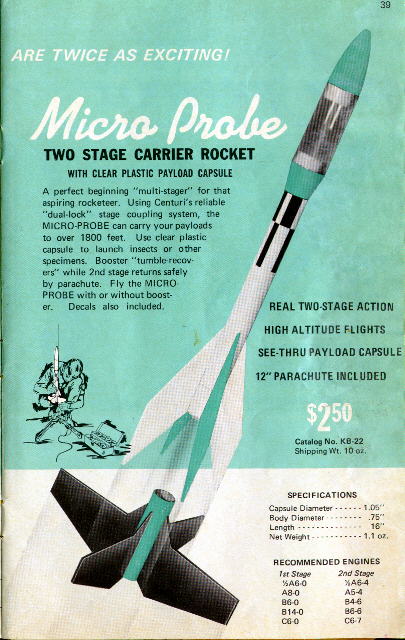
I have also started work on the clone of the Centuri Micro-Probe. A 2 stager in the classic Centuri style, this little rocket last made an appearance in the 1971 catalog. Never had one as a kid, but Semroc parts make it fairly easy to replicate, even with the unusual diameter of the clear payload tube. Today, I cut the body tubes and the payload section to the appropriate lengths and the booster fins have been assembled and are drying. Hopefully tomorrow evening will see the rocket assembled and ready for fin fillets.
I love modern electronics - stuff that was impossible in the 1970's is now not only doable, but cheap. This is especially true with rocket payloads - we now have gps and radio trackers, flight computers, and small altimeters, just begging to be shot into the big blue sky. I haven't got into the trackers and computers - yet - but I have assembled a collection of barometric altimeters over the years, in part because of my involvement with Team America Rocketry Challenge (TARC) and partly because I like to know how high my rockets go. These altimeters range from $25 to $150 in cost, and fall into one of two categories:
Peak altimeters - These devices are active throughout the flight, but lack the memory to produce a detailed flight profile. The simplest ones just beep or flash the peak altitude; more elaborate models will display other information, such as average speed, time to apogee, acceleration, and so forth. Examples of this class include the Jolly Logic Altimeter One and Two, the Estes Altimeter, and the PerfectFlite Firefly and APRA (The latter is an approved altimeter for this year's TARC competition).
Recording altimeters - These devices store information throughout the flight, usually at 0.1-0.2 second intervals. This data can be downloaded into a computer or other device, where it can be displayed and/or manipulated. Cheaper ones store data for only one flight, forcing you to download the data almost immediately if you wish to fly it again during a launch; others can store data for many flights, eliminating the need to bring your laptop to the field. Examples are the Jolly Logic Altimeter Three, the Altus Metrum MicroPeak, and the PerfectFlite PNUT (the other TARC approved altimeter for 2015).
Being a nerd, I swoon over numbers, so recording altimeters are my favorite. I love being able to adjust simulations to the profiles, which enables better determinations of drag coefficients and other things that give geeks delight. To paraphrase my colleague Joe Minow, "More data is good."
Some of my altimeters. On the left, starting at top: Estes Altimeter, PerfectFlite PNUT,
Jolly Logic Altimeter Three. On the right: Altus Metrum MicroPeak, PerfectFlite Firefly,
and the Jolly Logic Altimeter Two (pre 2014 version).
This year's Christmas present from me to me was a Jolly Logic Altimeter Three. I have been waiting months for this puppy to hit the market, as it downloads data to your smartphone, rather than using a USB cable connected to a computer. The MicroPeak's use of a flashing LED to transmit data to a USB adapter was cool and different, but the Altimeter Three is a new level of coolness - Imagine being able to control your altimeter inside your rocket from your phone? Plus the lack of annoying beeps, which had a not insignificant appeal.
Yesterday marked the first time I flew my Altimeter Three. Here are my initial thoughts:
The Altimeter Three (and the new Altimeter One and Two) is bigger than most of the others - it won't fit in a BT-20 tube, and is very loose in a BT-50. I found that a Centuri ST-8 (0.865" inner diameter) is a good fit, but you may have to make some custom rings to mount this inside an Estes body tube. Jolly Logic sells a snap mount to help attach the altimeter to a sled. Weighing in at 10 grams, the altimeter is also a little bit on the heavy side.
I like the change to a USB cable for charging the altimeter - a definite improvement over the pre-2014 Jolly Logic devices, which plugged straight into the USB port. They were way too easy to break.
The Altimeter3 app is currently only available for iOS. However, I just saw a note from John Beans saying that the Android version will be out this coming week, so don't let that stop ya from getting one.
The Bluetooth interface to the iPhone is a pain - John Beans, the man behind Jolly Logic, is pretty up front about this. Most of it isn't his fault, as Apple implements Bluetooth in a weird way (no big surprise). To help out, he provides a very good Bluetooth setup guide and I was able to get my connection up and going fairly easy. There was some funkiness reconnecting with the altimeter after the flight, but turning Bluetooth off and then back on solved the problem. Still, this was less effort than opening up the rocket and extracting the altimeter to listen to the beeps or watch the flashing LED.
The smartphone software is very good, and works as advertised. I was very pleased by the simple interface and the amount of data displayed - very nice to have available in the field! The ability to share data with your buds via email or social networks right after the flight is pretty darn nice, and I mucho like the well-formatted Excel spreadsheet that accompanies the email.
Initial screen of the Altimeter3 app -
You connect to and control the altimeter
from this screen - set mode, start and stop
recording (Click to enlarge).
Flight Summary screen. The StrongARM is
a default within the app. Tapping on a flight
brings up more detail (Click to enlarge).
The flight information screen. The flight
name and any notes are entered here
(Click to enlarge).
The chart screen, with the time and altitude
of apogee marked. You can mark additional
points to highlight other features on the plot
(Click to enlarge).
Map screen. The app uses your phone's
GPS to locate the launch location, which
is displayed on the map (Click to enlarge).
Sharing screen. You can email your flight
data or share it on social networks from the
field (Click to enlarge).
Excel spreadsheet accompanying the Jolly Logic Altimeter Three email (Click to enlarge).
If you are looking for a hi tech, fun altimeter for your rockets, this is the one to get. Recommended.
Today was a good day for TARC practice - comfortable temperatures (high 40's), partly overcast, and practically no wind. Duane and I arrived at the Research Park field just before noon, finding the two Liberty Middle School TARC teams already there and almost set to make their first launch. Four TARC teams would put rockets into the air over the next couple of hours - John Paul II's Jurassic TARC, the Falcon Rocketeers, Liberty Team Bazinga, and another Liberty team, the name of which I cannot remember - forgive me, I'm getting old.
Nate shows his team how to insure the launch rail is pointed straight up.
Liberty's "Silver Bullet" is about to take to the air (Click to enlarge)!
The first rocket left the pad pretty close to noon; it was almost non-stop flying after that. The "Silver Bullet" and "Orange Crush" rockets performed well for the Liberty teams, turning in some very good scores, including a "3". Altitudes were pretty much spot on; the closest was only a foot away from the goal (799 versus 800). There was a little trouble in the recovery department (chutes tangling, etc.), but I'm sure these teams will work through the packing issues. All the practice is paying off, and I was surprised by Liberty's efficiency. Big Nate and those kids were turning around TARC rockets faster than I could get my model rockets prepped. They is doing good!
The Falcon Rocketeers and Jurassic TARC are still trying to dial in the proper weights for their birds. The Aerotech E's did not have enough oomph to make altitude; their rockets were consistently beneath the target by over a hundred feet. So the switch was made to F's, which put them about a hundred feet too high. By the end of the day, they had the altitudes down in the 860 foot range; a little more work should get them closer. Duane is teaching Jurassic TARC how to use Aerotech reloads in their bird. They did well - 3 flights with no motor mishaps. This was good, because they borrowed my 24/40 reload case for today's flights.
Falcon's rocket leaves the pad with a blast of purple flame (Click to enlarge).
Other than a kid on one of Duane's teams, I was the only one flying modrocs today. Duane had brought two to fly, but he was consumed in being the "benevolent dictator" for his teams. I managed a fair number of flights - 5 total, one more than planned. First was my Estes Constellation clone on a B6-4, carrying my MicroPeak altimeter in the payload section. A good flight to 480 feet, made nicer by the rocket landing close to the pad.
My Constellation clone heads skyward on a B6-4 (Click to enlarge).
Constellation flight summary reported by the MicroPeak altimeter (Click to enlarge).
The Constellation was followed by the Estes almost ready-to-fly L.G.M with its alien decor. Fairly low altitude flight on a B6-4; another rocket needing C motors.
TARC team member's "Sacrificial" Alpha on a C
motor - it keeps coming back (Click to enlarge).
My L.G.M. lifts off on a B6-4; A TARC recovery team
is in the background (Click to enlarge).
The L.G.M. was followed by the trusty Centuri RX-16 clone. Powered by 2 C6-5's, it was going to make the first test of my new Jolly Logic AltimeterThree, a recording altimeter which transmits data to your smartphone via Bluetooth. The flight was great - nice altitude, good parachute deployment - but I must have messed something up with the Bluetooth initialization as the altimeter registered only 32 feet. Sigh... the good news is that I did get a decent lift off shot from my Go Pro Hero 3, which was pointed up at the pad:
RX-16 heading into the wild blue yonder on dual C motors (Click to enlarge).
After reading the altimeter instruction manual (no good rocketeer reads the directions before a first attempt), I prepped the RX-16 for another flight with a single C6-3. This time everything went right with the flight AND the electronics; the rocket flew to 283 feet, in rough agreement with an Open Rocket sim I did last night. I will have more on the AltimeterThree in a later post. It is really a nice device!
My final flight (and the next-to-last one of the day) was the Bullpup 1, my Geezer TARC entry for this year. Its first flight on two D12-5's was about 60 feet too high, so I strapped my keychain camera to the sustainer body, counting on the additional weight and drag to reduce the altitude down a few tens of feet. I was not disappointed, for the Bullpup soared to 806 feet - only 6 feet higher than the goal of 800 - and was down in 50.3 seconds, only 2.3 seconds beyond the 48 second duration limit. This would be a 15.2 score in TARC, beating any other score in this year's Geezer TARC. The fact that I should have done it the first time did not prevent me from doing a little victory lap around the apartment. This old man designed and built a bird that could loft to altitude the egg, regulation PNUT altimeter, AND a camera on just two D motors (E impulse) - half the power of the youngsters' F powered rockets.
You don't mess with a Bulldog...
The Bullpup 1 leaves the pad on two D12-5's (Click to enlarge).
Bullpup 1 flight vid.
Bullpup 1's sustainer parachute deploying (Click to enlarge).
After a last TARC flight, we packed up all the gear into Duane's SUV. I returned to my apartment, where I have spent the last few hours downloading pics, videos, and altimeter data. 5 flights can produce a lot of stuff!
I have been waiting on the arrival of the Micropeak USB adapter to resolve the difference between the altitude it gave (381.7 feet) for the peak of Saturday's Payloader One flight versus the 429 feet measured by the Perfectflite Firefly. As I mentioned in my earlier post, the Micropeak altimeter slipped its retaining ring and jumped around inside the payload section, but that does not seem to be a good explanation for the huge 47 foot discrepancy between the two. Unlike the Firefly, the Micropeak is a recording altimeter, storing data at roughly 0.2 second intervals for the first 48 seconds of the flight. That data can be downloaded into a Mac, Linux, or Windows computer using the optional USB interface, which I also ordered.
But I did not have the USB interface...
Tracking showed it delivered to my building's apartment parcel locker on Saturday, but the postman mistakenly placed the key to said locker in the wrong mailbox. I had to wait until yesterday to catch him delivering the mail, and when we checked, my package was not there, taken by the person who erroneously received the key. I was disappointed, as I could not recoup my loss (the package was uninsured), and the postman apologized profusely for his mistake. Returning to my apartment, I resigned myself to having to order another when I could scrape up the funds; answering the question of the peak altitude of the Payloader One would have to be postponed until a later date.
But today, after work, my faith in humanity was restored when a neighbor delivered the package to me as I was walking in the door. She and I were coming home from work at the same time, and she noticed my apartment number. Telling me to wait, she fetched the USB adapter, still in the unopened box. I was most happy, and thanked her profusely. Honest folk still exist!
Micropeak USB adapter. The altimeter is placed upside down, with the LED on
top of the sensor in the middle of the adapter.
I wasted no time in unpacking the adapter and connecting it to my computer. Being so small, the Micropeak has no USB connector - it communicates with the adapter by flashing its LED at 9600 baud, which is pretty nifty. I fired up the software, selected the USB adapter from the menu, turned on the Micropeak altimeter, and set it on top of the adapter with the LED facing down. A scant few seconds later, the flight profile was displayed:
Payload One flight profile (Click to enlarge).
Two things were immediately obvious from the plot:
The altimeter flopping around the payload section introduced strong oscillations in the data, especially in the speed and acceleration profiles (Big surprise, eh?), and
It was not given adequate time to sense ground level pressure, as it has the rocket landing at -54 feet. Ground level is supposed to be at 0.
This then is the answer to the discrepancy - the actual altitude attained by the Payloader One is the 381.7 feet reported by the flashing LED + the 54 feet below zero, as that was the real ground level. 381.7 feet + 54 feet = 435.7 feet, which is in reasonable agreement with the 429 feet reported by the Firefly. I can live with a 6 foot difference.
This is why I like recording altimeters - I would have never known that the Micropeak had not sensed ground level and adjusted its zero without looking at the data. Well worth the additional money (The Firefly costs $25; the Micropeak $50).
The software also displays a nice summary of the flight, and presents the raw data in tabular format so it can be copied into other applications, like Excel. You can also export the data as a csv file for import into almost anything. It's a pretty nice piece of code and runs under Mac OS X, Windows, and Linux.
Payloader One flight summary as reported by the software (Click to enlarge).
Raw data display (Click to enlarge).
I can't wait to fly this altimeter again - it is very easy to use! Will have to work on a proper mounting scheme, though. These things are really small, unlike the older altimeters in my collection.
We spent some time looking for the Drifter booster - it was found a short distance from the pad, just to the north of where we thought it landed (naturally). While Duane prepped his yellow and black Beast, I launched my venerable Quest Aries on a B6-4. It left the pad like a pig, barely grabbing enough altitude to deploy the parachute. C motors or nothing for this puppy, even in small fields (click any pic to enlarge).
Quest Aries on pad.
Duane's Beast was next, on an Aerotech F20-7. Lift off was perfect, but the payload section with the egg drag separated at motor burnout. The payload chute opened, allowing that section to descend softly to the ground, but the sustainer parachute stayed inside the body. That part came in ballistic, hitting the ground with a loud thump. As you might suspect, the body tube got scrunched, but Duane had wisely made the fin can separable by removing the rail buttons. The Beast will fly again!
The Beast on a F32.
Damaged Beastie!
My last flight of the day was the Nike-X clone, a favorite from my youth. It performed very nicely on the B6-4, the orange rip stop nylon parachute landing it softly on the grass.
My Nike-X streaks skyward on a B6-4.
The last flight of the day belonged to Duane, who was flying his Estes Mega Mosquito for the second time this month. The first flight on a D12-3 was beautiful; Duane aimed to repeat that success today. Alas, it was not to be. Shortly after ignition, the D12-3 motor cato'd, producing a pretty spectacular fireball amidst the separating rocket. I feared that the body tube had been blown out, but fortunately only the motor tube saw damage. Repairable.
D12-3 cato in Duane's Mega Mosquito
Cato 0.1 seconds later.
Animated gif showing the cato sequence.
And so it was that our launch came to a fiery end, just 1 hour after it began. Duane and I both agreed that we have to do this more often - flying our rockets is fun!
Been a while since I have done anything rocket related (for me). Holiday travel busted my chops in December, and there was much catching up to do at work. However, today that changed with a launch of a few rockets on a fine Saturday afternoon.
Duane had been scoping out a field near Research Park here in Huntsville that seemed suitable for model rocket launches - roomy, low grass, not too muddy, and very few trees. Best of all, it's close - only a few blocks from my apartment. We arrived at the field just after 1, quickly set up 3 pads and a couple of controllers, and commenced launching. I had prepped 4 birds:
Quest Payloader One, loaded with a B6-4 motor and 2 tiny altimeters (a Perfectflite Firefly and an Altus Metrum Micropeak).
Estes Drifter (modern almost ready to fly model), outfitted with a booster stage and a keychain camera. Motor choice was a C11-0 in the booster and an A8-5 in the sustainer. Winds were up to around 10 mph, and I did not want to have to chase it across Research Park.
Quest Aries, loaded with a B6-4. This is an older Quest kit, with all sorts of plastic bits and pieces for ornamentation.
Estes Nike-X clone, with a B6-4. One of the "old reliables" of my fleet.
Duane had 3 rockets:
The Kestrel - his BT-70 based brown and silver TARC rocket, loaded with an Aerotech E15.
The Beast - a BT-80 TARC design flying on a F20.
Estes Mega Mosquito, powered by a D12-3.
My Payloader One took to the skies first - the flight was textbook, landing just about 50 yards from the pad. The Firefly altimeter reported the peak altitude as 429 feet; the Micropeak said 382 feet, but it got slapped around in the payload section when a retaining ring slipped. I will have to investigate further when the USB unit arrives so I can look at the flight profile (the Micropeak stores 48 seconds of data).
Duane's Kestrel was up next on the E15. He used my Jollylogic Altimeter 2 as his was dead (not charged). Once again, a textbook flight, but the altimeter recorded an absurdly high peak altitude of 1500 feet. The true altitude had to be closer to the parachute deploy reading of around 600 feet, as ejection was close to apogee. (Remember to click on any of the pics to see a larger version).
Payloader One leaving the pad.
The Kestrel heads skyward.
The Estes Drifter is an almost-ready-to-fly rocket released by the company in the last year. Easily built in under 30 minutes, it and some of its brethren have optional boosters you can buy to turn them into double stagers. These plastic boosters simply slip onto the bottom of the rocket once the motor retainer is replaced with a screw-on adapter ring. This was my first use of this new Estes technology, and it worked rather well. The Drifter got some altitude on the C11-0/A8-5 motor combination, and I got some decent video from the keychain camera taped to the side.
Drifter liftoff on a C11-0.
Real time video goes by quickly. Here are some of the more interesting frames - 1st, the staging sequence:
And a view of nearby housing and part of Research Park as the rocket turns over:
The progress in modern electronics never ceases to amaze me - I always thought that the Perfectflite PNUT - a scant 0.7 x 3" in dimensions - was small, especially given the wealth of data it provides. However, there are some very nice small altimeters that don't connect to a computer's USB port. Perhaps the most famous of these is the Jolly Logic Altimeter 2, which not only will measure the peak altitude of the rocket, but will also give a host of other information like engine burn time, max acceleration and speed, coast time, time from apogee to ejection, and so forth. It's a really nice product, and the company president, John Beans, stands behind his work. I am very much looking forward to his Altimeter 3, which will transmit data via bluetooth to a smartphone. How cool is that?
My latest acquisition is Perfectflite's latest product - the Firefly. This very tiny altimeter is only 1 inch long by 0.7 inches wide, and weighs a scant 0.12 ounces with the battery. Unlike other Perfectflite altimeters, it gives the peak altitude and speed via a series of blinks of an LED, rather than a sequence of beeps. I can't wait to try this puppy out - it should fit in almost any rocket!
Plus, at only $25, the price won't seriously hurt the wallet.