Liberty launches a TARC rocket on a practice flight
Earlier this week, I was suffering through a cold; today, after some decent rest, I felt well enough to join Duane for a trip out to Pegasus field and watch some TARC practice. Nate was out there with his Liberty teams, and they had already put a bird in the air by our arrival at 10 AM. The Liberty teams are very efficient; in the two hours they were at Pegasus, they set a good pace, completing a total of six practice flights. They had a bit of trouble hitting the altitude mark, with one broken egg and a few kicked motors, but the Liberty teams walked off the field with their rockets intact. This was not true for the Falcon Rocketeers, whose primary rocket was destroyed when it came in ballistic on its first flight - shredded body tube, egg yolk all over the place, and an altimeter that seems to have suffered major electronic brain damage. Not daunted by the buzzard now circling overhead, the Falcons switched over to their backup rocket and made four successful flights with this model; if the buzzard was searching for more rocket corpses, it was disappointed.
Nate shows a team member how to connect an igniter
(Click to enlarge).
A Liberty rocket leaves the rail (Click to enlarge).
Launching Liberty's "Atomic Bomb" rocket (Click to
enlarge).
The Falcon Rocketeers' primary rocket on its way up
(Click to enlarge).
And after it came down... (Click to enlarge).
The Falcon Rocketeers at work (Click to enlarge).
Falcon's backup rocket poised for launch (Click to
enlarge).
The performance of the blue and green backup rocket was puzzling to the young rocketeers, as no matter how much weight was added or taken away, it veered sharply into the wind, ending up about 100 feet shy of the altitude goal. It was as if the rocket was defying all logic, absolutely refusing to go higher than 750 feet. The team's last flight was around 2:30 and yielded a disappointing peak altitude of 730 feet; the Falcon Rocketeers left the field musing on the mysterious behavior of their backup and laying plans for the construction of new rocket to replace the destroyed primary. However, there was one bright spot - they achieved a new record in prepping and launching the rocket for the final flight in under 20 minutes. Duane, the "benevolent dictator", was pleased.
The Red Grasshopper on the pad (Click to enlarge).
The Red Grasshopper starts its 1st flight (Click to
enlarge).
Marc is becoming a regular at these Saturday launches, and he was there today with his children and his retro "Red Grasshopper" rocket. He also intended to fly a Semroc Orbital Transport, but that model suffered a mishap in the car on the way to the field; hopefully, it will fly at our next launch. The Red Grasshopper is a crowd pleaser with its sci-fi looks and slow takeoffs - its first flight was picture perfect, but the parachute did not deploy on the second, resulting in a very hard landing. There were a few pieces, but it think it is repairable, especially given Marc's building skill.
My Estes Stinger awaits its 1st flight (Click to enlarge).
The Viking 7 is propelled upward by dual B6-4's
(Click to enlarge).
I couldn't imagine a sunny day at Pegasus without flying a few of my birds, so I brought four. The Centuri Nova clone and the Estes Stinger would make their first flights, joining my Rocketarium scale model of the Viking 7 and the battle-hardened Little Beth X-2. I started with the Stinger, which put in a good show on an A8-3. All seemed well until I inspected the model after landing, when I discovered the paint on the leading edge of one fin had been knocked off by the nose cone snapping back at ejection. Muttering a curse at Estes for too short shock cords (and at myself for not replacing it with a longer one), I put the model back in the SUV; it now resides in the minor repair box, awaiting a paint touch up. No biggie, but still annoying.
The Centuri Nova streaks up into the sky (Click to
enlarge).
Little Beth starts up the rod (Click to enlarge).
Next was a flawless flight of the Viking 7, riding the fire of 2 B6-4 motors into the sky. The clone of the Centuri Nova stunned everyone with its speed - a light, small rocket really moves when you have an A10 motor stuffed in its rear. Then came time to fly the rocket that never ceases to pose a challenge to me - the Little Beth X-2, loaded with 2 B4-2's in the outboard pods of the 1st stage, with a B6-0 sandwiched between, and a B6-4 in the upper stage. The plans for this model - Estes Design #57 - call for a C6-0 rather than a B6-0 in the lower stage, but I, an experienced rocketeer of many decades, knew that a B6-0 would work just as well, and also save me a few yards of walking. Never mind that all past flights of this model that used a 1st stage motor combo different from that specified in the plans have failed spectacularly - today would be different.
Yeah, right...
The Quest Q2G2 igniters had no problem igniting the 3 booster motors, and Little Beth X-2 streaked off the pad, the keychain camera recording the action from the rocket perspective. All went well until the B6-0 burned out, at which point the rocket started gyrating wildly; the first stage then fell away, the gyrations stopped, and the model continued up to a lower than expected apogee. There was no ejection charge, and I watched in horror, fully expecting the model to dive straight for the ground. But I suppose the rocket gods took pity, for Little Beth's upper stage descended horizontally, spinning rapidly about the long axis. This slowed the fall, and the rocket survived its landing with no damage. The post flight inspection showed that the B6-0 in the first stage had been kicked, and that the B6-4 in the upper stage had not ignited, which explained the low altitude and no ejection charge. I was still puzzled by the gyrations just before the stages separated, and hoped that the flight video might provide some clues.
A few hours later, I had uploaded the video to my computer and was looking through the individual frames. The video seems to indicate that the 1st stage was partially separated from the upper around the time the B6-0 burned out, as you can see part of the coupler connecting the stages. That would explain why the upper stage motor did not ignite, but was the separation caused by gyrations or by the hot gases from the depleted B6-0 (you know, the gases that were supposed to ignite the upper stage)? My best guess is the latter, and I suspect the gyrations were caused by a thrust imbalance between the B4-2 motors in the side pods (which burned for 0.2 seconds longer than the B6-0), aggravated by the camera taped to the side of the rocket. Once the first stage falls away, the ground is now longer blurry in the video, verifying that the gyrations had stopped.
After B6-0 burn out - note the exposed coupler (grey tube just beneath the black fins - Click to enlarge).
B4-2 motor burn out (Click to enlarge).
1st stage separation - note that the B6-0 motor in the center tube is no longer there (Click to enlarge).
The 1st stage falling away (Click to enlarge).
My take-away from this flight is that the center motor of the 1st stage must have a burn time equal to or greater than that of the motors in the side pods. A C6-0 burns for 1.8 seconds, 0.8 seconds longer than the B4 motors, so it is the recommended choice. And I think I will use the C in future flights, even if it does mean more walking - Little Beth has had more than enough hard landings.
At the end of May/beginning of June of each year, HARA and the Music City Missile Club (MC squared) hold our biggest annual launch, Southern Thunder. However, this year it's going to be different; for the first time in many, many moons, we are going to host a national event, the National Association of Rocketry's National Sport Launch (NSL). This Memorial Day weekend, rocketeers from all over the country are going to converge on the launch field in Manchester, and hundreds of rockets are going to take to the sky. I am very excited at attending - and probably working - this event... it will be amazingly fun!
Launches like NSL (or LDRS or BALLS or ...) are perfect venues for rocketeers to showcase special projects they have developed for big launches. These are usually level 3 high power certifications or group rockets, such as a big scale V-2 or Mercury Redstone. I too must have something special to fly; while my club would love to have me build and fly a level 2 certification rocket, my sights are set on a bit smaller model that's way more nostalgic, going back over 47 years.
The very first post in this blog (written 2 years ago this month!) describes how I first became interested in model rocketry, enticed by the Estes 1968 catalog and a rocket owned by a neighbor. This rocket, the design of which was inspired by science fiction of the day, symbolized everything that was rocketry to my youthful self; I still find it amazing that I have never built or owned one, in all of the rockets I have purchased and built through the decades. So I have decided to build one for NSL, and my decision became even more certain and appropriate when I realized that the kit was first released by Estes in 1966, making 2016 its 50th anniversary.
Gentle readers, I present to you my 2016 NSL project - the Estes Mars Snooper!
Probe-18 fin can, showing some of the damage (click to
enlarge).
Back on September 5, my scratch built Probe-18 rocket suffered damage on its maiden flight. The
payload section, carrying two altimeters, snapped back just after ejection, whacking one of the basswood fins, thereby causing a partial failure of the lower part of the body tube (held on by double glue joints, my fins do not come off - they may break, or the body tube fail, but they will not rip away). At the time, I was not sure if the mishap was caused by a "shot gun" ejection charge of the B6-4 motor - which seemed to be indicated by the buckling of the tube just above the motor mount - or if the shock cord was too short (2 rocket lengths), or a combination of both. At any rate, the rocket was consigned to the repair box when I returned from the HARA launch, where it has lain for 5 months.
The Probe-18 before its 1st voyage (Click to
enlarge).
Today's weather was cold and dreary; perfect for staying indoors and doing some rocket stuff. I spied the Probe-18, and after once again inspecting the damage, decided it was to time to repair this little beauty. The lower body tube was pretty much a lost cause, but everything from the base of the launch lug forward was in great shape; I therefore decided to cut away the fin can (the lower 3 3/8" section). This was easily accomplished by wrapping some card stock around the body tube to serve as a cutting guide - a couple of passes of the hobby knife was all it took to get a nice clean cut. The payload section and upper part of the tube were set aside so I could start building the new fin unit, which was assembled from a scrap piece of body tube and a piece of basswood. The spiral seams of the tube were filled with thinned Elmer's Fill N Finish, and I glued a 1.5" length of BT-50 coupler into the forward end of the unit so that it could be mated to the rest of the rocket, and also to provide a bit more protection against energetic Estes ejection charges. I also lengthened the shock cord by several more inches beyond that of the original, to reduce the chances of the payload section hitting the body at ejection. Construction is now finished; now comes the finishing, with fillets, sanding sealer, primer, and paint.
Will have to wait for better weather for the sealer, primer, and paint. Hopefully that will come towards the end of next week.
The new fin can, awaiting finishing (Click to enlarge).
The Falcon Rocketeers had scheduled a practice today at noon, which provided an opportunity for me to a launch a few members of the fleet. At first, the weather seemed almost perfect - slight overcast, very little wind, and temps in the upper 40's. However, as the day drew on, the wind strengthened a bit and shifted direction to from the north rather than from the east. North winds are always cold, and I found myself trying to keep my hands warm by sticking them into my coat pockets. Outside of the chill, it was a very good day for a launch; I sincerely doubt we will have many days with such quiet winds over the next couple of months.
The Falcon Rocketeers prep one of their TARC rockets for a flight; Duane's yellow and black "Beast" is in the
foreground (Click to enlarge).
The Falcon Rocketeers are improving - even though their scores were not that great, they managed to put in four practice flights in the two and a half hours we were at the field, without a single problem. Making 4 straight flights with no mishaps is a pretty good streak, and the Falcon Rocketeers deserve a little shout out for this. They have the cadence, so now they need to work on their scores.
A Falcon TARC rocket heads skyward (Click to enlarge).
Marc and son pursue his Geezer TARC rocket (Click
to enlarge).
Marc joined me and Duane on the field, with family and rockets. He made three flights; the first, an Estes Executioner, lumbered off the pad on an E9 motor, but did manage to grab some altitude in the quiet air. Unfortunately, the parachute failed to clear the body tube and the rocket nosed in for a very hard landing. The damage is repairable, but it will require a new body tube segment to replace the crumpled one. His other flights involved his Geezer TARC rocket; the first flight ended with a cracked fin, but a little five minute epoxy had it ready for a flawless second flight. Marc is a lot smarter than me, and he already is working on an altitude control scheme for this year's Geezer TARC challenge. I shall have to hope that my experience and deviousness can overcome his technology.
Duane was accompanied by his recently-repaired Geezer TARC rocket, the yellow and black "Beast." I love the Beast - big and robust, it's the archetypical TARC rocket. We use it as a set piece in our TARC recruitment talks because it just screams TARC. It also flies well - today's flight was arrow straight on a Aerotech F50, with a good recovery in the field.
Marc's Executioner starts its ill-fated journey (Click
to enlarge).
Duane's Beast tries to pierce the clouds (Click to
enlarge).
I brought four rockets to fly, and I am pleased to report that all of them flew without any problems. I started off with my Estes Chuter-2 on a B6-4, followed by my EAC Firecat clone on an A8-3. I worry about the Firecat; being a model of a fictional target drone, it has fins on fins and a simulated antenna, all of which can be easily broken on a hard landing. Fortunately, a 12" parachute brings it down plenty slow, and hitting the ground should not be a problem if it lands on grass. My third flight was that of my Estes Citation Quasar clone, also on an A8-3. Gordon at Excelsior Rocketry produced a quality body tube wrap that gives this model a classic look.
The Chuter-2 heads up the rod on the 1st flight of the day
(Click to enlarge).
The EAC Firecat rises out of a cloud of smoke (Click
to enlarge).
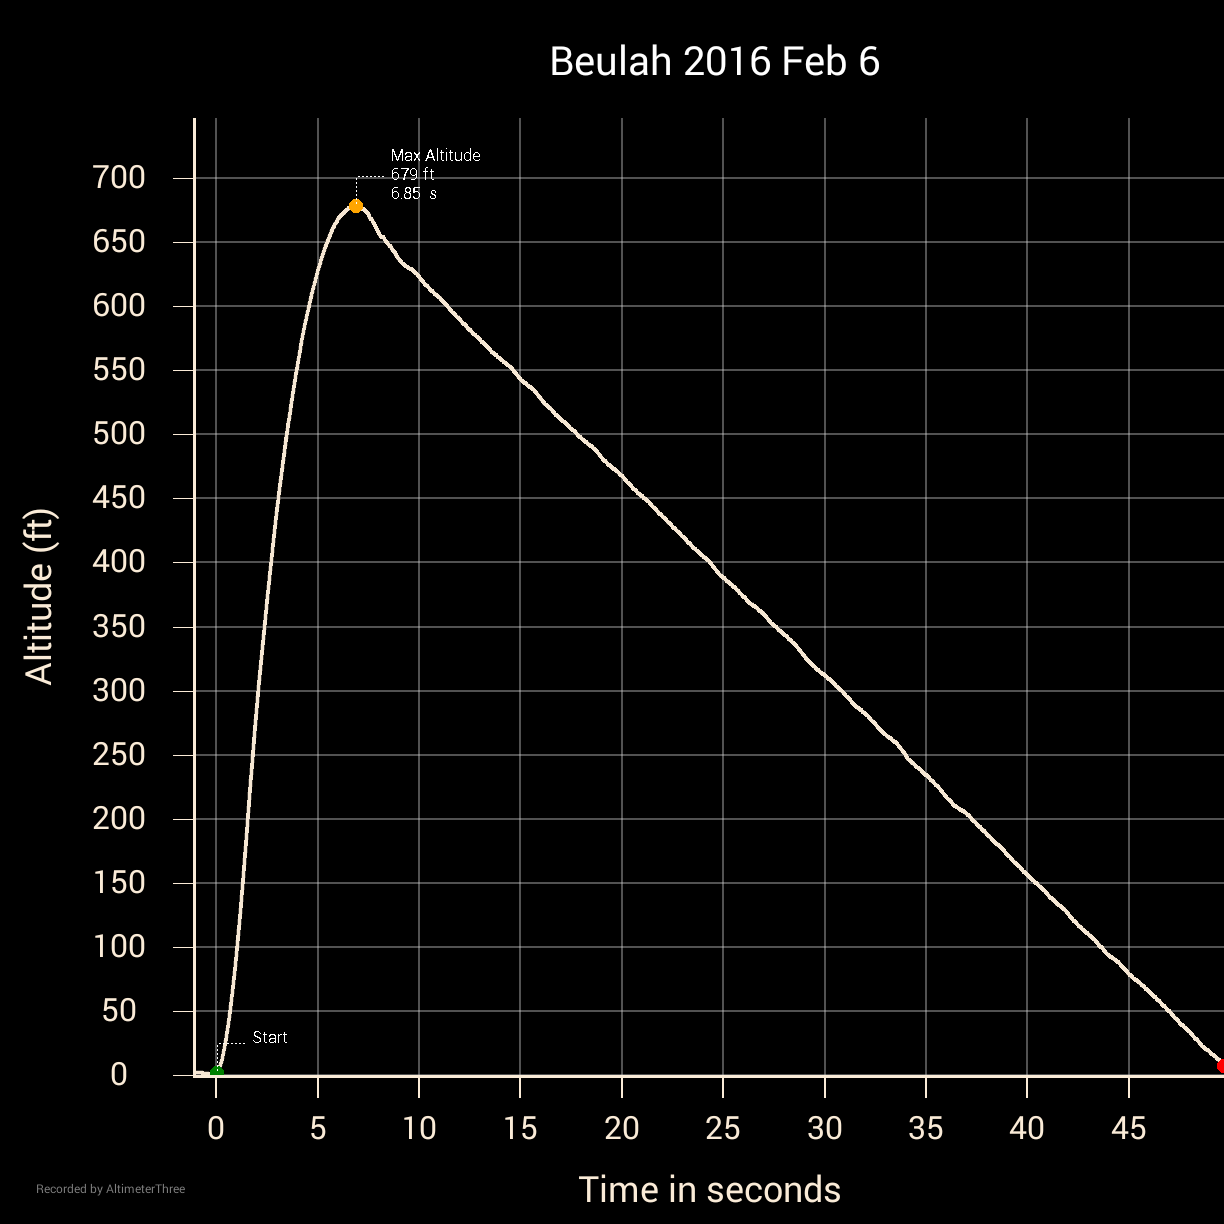
Big Bertha's sister Beulah made my final flight of the day, with a Jolly Logic Altimeter 3 in her payload bay and a keychain video camera strapped to her side. Bluetooth issues have disappeared since I paired the Altimeter 3 with my Kindle, making the device a true pleasure to use. I used the Kindle to start up the altimeter just before placing the rocket on the pad, and it downloaded the data automagically when the rocket was returned to the prep table. The D12-5 in Beulah powered her to 679 feet, a little higher than expected, but the video was somewhat disappointing due to the mostly overcast day.
Beulah clears the pad (Click to enlarge).
Beulah's altitude profile as measure by the Jolly
Logic Altimeter 3 (Click to enlarge).
A couple of frames from Beulah's video camera (Click to enlarge).
After the launch, Duane and I stopped at Burger King for a belated lunch; I must confess that I was glad to be indoors. Even light North winds can give one a big chill!
A few months back John Beans at Jolly Logic announced he was working on a new product - a device that could release a parachute at a specified altitude without using explosive charges, called the Chute Release. He posted updates on his progress to the Internet, and I found myself keenly interested - I'm all over anything that reduces the distances I have to schlep to recover rockets. Ergo, when he announced the product's availability, I promptly went to the Jolly Logic web site and ordered one. It arrived in about 3 days, packaged in a slick-looking box. The arrangement of components inside the box was just as slick, with everything neatly organized and labeled.
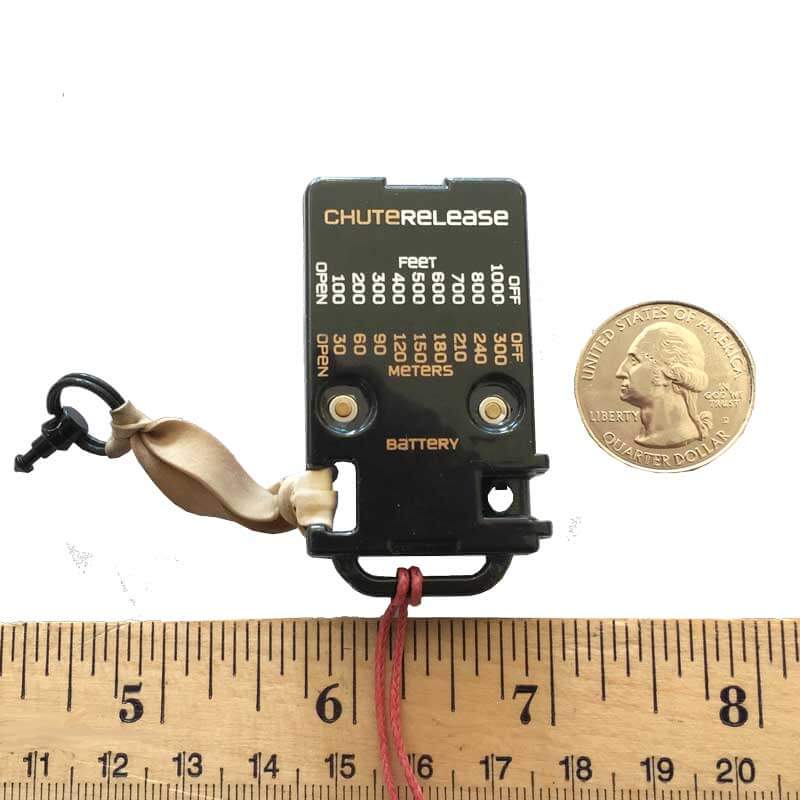
The Chute Release works as follows - a rubber/elastic band is wrapped around the parachute and connected to an altimeter-controlled device which releases the band at a set altitude. It's very, very easy to use - you simply press a button to set the altitude (in 100 foot increments), and there is a setting for testing the parachute release, to make sure the chute comes free cleanly. The Chute Release is a bit on the hefty side at 0.6 ounces, and you would be hard-pressed to fit it in anything smaller than a BT-60 body tube, but these are not significant negatives. The device charges via a standard USB connector, and my first tests caused me to salivate at the thought of using it in a 2 stage Estes Omega loaded with D12's or even E12's - I could deploy the parachute at 400 feet or so and save myself a lengthy hike. Perfect for an old, chubby rocketeer!
The Jolly Logic Chute Release (Image from the Jolly Logic website).
John Beans explains how to operate the Chute Release
Saturday I prepped my trusty clone of the Centuri RX-16. This rocket, part of the old Centuri Power System, was an appropriate choice, as it is based on a BT-60 (actually, ST-16) tube and was marketed as a "science testbed"; peak altitude was determined by timing the fall of a ping pong ball kicked out by the rocket at parachute ejection. It also featured interchangeable motor mounts, and the afternoon's flight used the single 24 mm mount, loaded with an Estes D12-5. I had to go with the D12, as the RX-16 would also carry a keychain camera in an attempt to image the deploy; this adds another 0.5 ounces of weight, on top of the additional 0.6 ounces of the Chute Release. As mentioned in my previous post, a tiny Altus Metrum altimeter was loaded in the payload section.
Clone of the Centuri RX-16 (Click to enlarge).
Following the instructions, I attached one of the small rubber/elastic bands to the Chute Release, which was then tethered to the shroud lines of an 18" rip stop nylon parachute. I had to practice rolling up the parachute a couple times before I was able to get a nice, tight bundle; once this was done, I wrapped the band around the parachute and slid the Chute Release/parachute combination into the sustainer. I was please to see how loose the combo was in the ST-16 sustainer body tube. After arriving at the field, I performed another release test, repacked the parachute, and set the Chute Release to deploy at 300 feet, as the instructions recommend allowing 50-100 feet for the parachute to unfurl.
The RX-16 was the first one launched Saturday. It quickly lifted off the pad, arcing into the strong southern wind; ejection occurred a couple of seconds after apogee. I held my breath as I watched the model fall, the parachute fluttering behind, held closed by the Chute Release. I began breathing again when I saw the bright orange canopy open wide at about the right height, and the model descended to a safe landing on the grass. Success! All that remained now was to look at the data, which I did as soon as I got back to the apartment. The altimeter data and video were downloaded to my Mac, and I then proceeded into Nerd analysis heaven.
The altimeter data was first up - It showed the RX-16 achieved an altitude of 542 feet, with ejection occurring 2 seconds past apogee, at 7.8 seconds into the flight. The descent rate abruptly changed from 36 feet per second to 16 feet per second 14.1 seconds into the flight, indicating that the parachute had fully deployed. This happened at an altitude of 260 feet, some 40 feet below the 300 foot altitude programmed into the Chute Release. A look at the video placed ejection at frame 371, and the Chute Release was clearly separated from the parachute at frame 526, 4.65 seconds after ejection. This suggests the Chute Release let go of the parachute about 12.4 seconds after launch, at which time the somewhat noisy altimeter data gives a height of 325 feet. It then took about 1.7 seconds or 60ish feet for the parachute to fully open - in good agreement with the instructions.
RX-16 flight summary (Click to enlarge).
RX-16 altitude profile (Click to enlarge).
Parachute held closed by the Chute Release (Click to enlarge).
Unfurled parachute and the Chute Release (Click to enlarge).
So there you have it - the equivalent of dual deploy in a model rocket without the need for explosive charges. Absolutely awesome! This little device opens up a whole realm of possibilities, and I'm going to be using it a lot. My only gripe is that John Beans has now eliminated my last excuse for not building an Estes Omega clone...
Time to break out the wallet, rocketeers. Find a vendor on the Net, and buy one!
Rocket videos go by so fast in real time; it takes stepping through frame by frame to uncover the neat stuff. I really liked the onboard video from today's RX-16 flight - the colors reminded me of the old Cineroc movies. So here are a few frames from that video; I hope you enjoy them!
Near apogee (Click to enlarge).
A few frames later (Click to enlarge).
Looking down the tube at the moment of ejection (Click to enlarge).
The sustainer against the blue of the sky (Click to enlarge).
The parachute canopy (Click to enlarge).
The Jolly Logic Chute Release up close and personal (Click to enlarge).
It would seem that no matter how much I try to practice moderation in my hobby, I end up burning out. I pretty much stopped doing rocketry-related things around Thanksgiving, and am just now reviving my enthusiasm for flying and building. Flying is easier, so that's what happened today. The building will recommence soon - I still have one rocket in primer and two on the bench, all three of which are clamoring to be finished.
Today was sunny and comfortable, with temps in the mid-60's. It would have been perfect, except for the wind out of the south, which was a blustery 10 to 15 mph. However, that did not discourage me from flying a few - after all, windy days are why we have the lower impulse motors. Also, the two Pope John Paul II teams - Jurassic TARC and Falcon Rocketeers - were going to be out practicing and I wanted to take a gander at their progress.
Marc's rocket streaks upward on a B6 motor (Click to
enlarge).
Vince's rocket leaves the pad (Click to enlarge).
Duane picked me up and we moseyed over to Pegasus field; the TARC teams were getting set up, and Marc, Vince, and Woody would soon join us under the sunny blue sky. Vince put up a couple of Estes kits, and Marc - who was accompanied by his kids - also launched a few. Woody's rockets were loaded with C motors, and he wisely decided not to fly them, as they stood a significant chance of ending up in Oz. Today's flights were notable not for height, but for the fact that the wind caused them to drift a distance greater than their altitudes. It was sufficiently strong that the TARC teams packed up after Jurassic TARC's yellow rocket did a severe turn into the wind right after leaving the rail. Not much point in practicing under conditions like that. A very short TARC practice!
Jurassic TARC's rocket acts into the wind (Click to
enlarge).
My Sizzler blasts off as Jurassic TARC looks on
(Click to enlarge).
I launched three birds - my Centuri RX-16 clone on a D12-5, the Estes Sizzler clone on an A8-3 (maiden flight), and the Aerospace Specialty Products NEO Standard on an A8-3. The Sizzler and the NEO were incidental flights; my focus was on the RX-16, which was flying to test the Jolly Logic Chute Release I received this past week. This rocket was instrumented to the max - not only was the Chute Release attached to the parachute, but I had loaded my MicroPeak recording altimeter into the payload section and strapped a keychain video camera up near the nose in the hopes of getting some good footage. I had considered using the Jolly Logic Altimeter 3 to send altitude data to my phone, but decided in favor of the much lighter MicroPeak to keep a thrust to weight ratio of 5 to 1 - very important on windy days.
The NEO Standard leaps for blue sky on an A8-3 (Click
to enlarge).
The instrumented RX-16 starts its test flight (Click to
enlarge).
All three flights went very well, though I did pause a bit when it looked like the NEO was going to drift into the middle of the road. Fortunately, the wind let up just enough to permit a landing on the grass at the near edge. Here's the video from the RX-16 flight; you can see that it was truly a nice day to be outdoors.
I will give more details on the RX-16 flight and the performance of the Chute Release in my next post. But I would like to end with a shout out to Perfectflite, who repaired my damaged PNUT altimeter free of charge. They are truly a class act, and it is no wonder their electronics are widely used within the rocket community. My sincere thanks to them!