Wednesday, May 31, 2017

The crafter of nose cones...

I am what is termed a "builder" - I take parts and assemble them into a complete rocket. However, I do not make the nose cones, transitions, and other parts - that is the role of vendors and "makers", such as my friend Duane. To be truthful, I have no desire to transition from builder to maker, because a) I am a klutz extraordinaire, which makes me extremely cautious around power tools, and b) I have little creative talent, preferring to build rockets from plans and paint them according to the kit art. But I do greatly admire makers, so when Duane offered to show me how he crafts nose cones and transitions this past weekend, I took him up on the invite.

In theory, making nose cones and transitions is easy - you spin a balsa block in some sort of power tool and use chisels and other sharp objects to carve the spinning block to the desired shape.  The tools are not hard to find or acquire - Duane has one of those nifty 5-in-1 shop tools, but I have known people to use electric drills for small cones. The main requirement, as in so many things, is patience. A steady hand is also necessary, which is why I am not too keen on making nose cones - I do not wish to do the klutz squeal of "Whoops, there goes part of my finger." But based on my observations this weekend, a fearless, sure-handed individual can make a BT-80 size nose cone in about 30 minutes, including frequent stops to make measurements and check shoulder diameter.

Duane checks the shoulder diameter using a piece of BT-80 (Click to enlarge).
Duane had already glued a wooden dowel into the center of the balsa block, which was then carved to a hexagonal shape. This was then placed into his shop tool, with the dowel fitted securely into the "drill chuck". The block was spun at a decent speed, and I watched as Duane used his chisels to shape the cones. First up was the shoulder, which he carefully formed using a big chisel, stopping every so often to measure the diameter with a caliper. When it was close to BT-80 size, the chisel was exchanged for sandpaper, which removed the final bits of balsa. There were numerous stops here, as Duane was constantly checking the diameter by trying to slide a piece of BT-80 tube over the shoulder.

The nearly finished nose cone (Click to enlarge).
After the shoulder was done, the chisels came back out as Duane shaped the curve of the nose. This was easier than I thought, and it was not long until a very nice nose cone took on its final appearance. The short video below shows Duane doing the early shaping of the nose. I was quite impressed with the quality of the final product, and hung around to watch him make a BT-70 to BT-80 transition for his Geezer TARC rocket. This was done in a similar fashion, except a transition has two shoulders. After another half hour, Duane had his transition, which would have cost around $15 from a vendor. His was the cost of the balsa, which was probably about $5 - not too shabby!

But I still ain't going to mess with power tools - $15 is a small price to pay to preserve my extremities.

Sunday, May 21, 2017

Which is the smoothest ride - rod or rail?

For the first time, the TARC rules state that the top 100 contestants making it to the Nationals cannot use a rod; however, they can practice and qualify using one. It's difficult enough to achieve a good score with all the variables associated with the rocket, so I can greatly sympathize with any team showing up at Manassas that qualified with their rocket being launched from a standard 1/4" rod. Yes, they can add rail buttons and practice in the month between final score submission and Nationals, but what effect will this change have on the flight performance? Does a rail exert more friction on the rocket than the rod, thereby causing a loss of altitude and cancelling the benefit of its increased rigidity? Or is the rod, with its well known "rod whip", going to cost the model even more altitude? It's important I find out, because a couple of my designs for this year's Geezer TARC barely make the goal with the optimum motor configurations for deployment at apogee, and I need to know if I can go with these motor combos. Duane attributes his loss last year to rail friction (his model was a couple of hundred feet low), and I have no desire to follow in those footsteps.

Here are a couple things I do know:
  • No simulation program - Open Rocket, RockSim, SpaceCad, etc - takes into account the friction generated as the rocket slides up the rail or rod. These codes can roughly account for the atmospheric drag of the lug or rail buttons as the model progresses through its trajectory, but assume that the rod or rail is frictionless, which ain't realistic.
  • Calculations done by Tim Van Milligan at Apogee Rockets indicate that rail buttons are more draggy than launch lugs, especially if the lugs are fairly long, and have had their ends modified. So there is going to be a performance hit even if the rod and rail exert the same friction, leaving open the question of whether the simulation programs can model this properly (lugs are in the codes, but rail buttons have to be "kludged").
The above are not very helpful in providing the numbers I need. That means I need to collect data - which means an experiment is in order. After a little thought, I have devised the following scheme:
  • Construct a mid power rocket - must be a decent size so that the rail buttons/launch lug do not dominate the drag. It turns out I have the perfect kit - the Balsa Machining 3" School Rocket, which has a pre-slotted 3' diameter tube, laser cut balsa fins, and a nice plastic nose cone that will reduce the amount of time spent finishing the model. All I need to do is add a payload section to hold an altimeter, plus replace the 24 mm motor mount with a 29 mm to provide some needed power.
  • Launch the above model several times, alternating between rod and rail pads. Both the rod and rail should be as close to vertical as I can make them, and the launches should be dome quickly, with little time separation. This will minimize the effects of changing weather. Each set of two launches (rod and rail) should be done with motors from the same pack or batch to reduce motor variations. What I am looking for is a trend among the flight altitudes, with either the rail or rod producing consistently lower altitudes. If there is no such trend, I need to try to evaluate whether something is messing with my experiment; if not, then the conclusion is that it doesn't make much difference which type of pad you use.
Here is a screenshot of the OpenRocket design of the modified School Rocket, which I call the GDTV-1 (Guidance Drag Test Vehicle #1). I have already started cutting tubes and have ordered the rail buttons in anticipation of performing the experiment at this year's Southern Thunder (June 24/25). Pegasus Field is already overgrown, so I doubt we will be launching there much until it is mowed in the Fall. This will force me to attend the club launches in Manchester if I want to fly every month.
The GDTV-1 (Click to enlarge).

Sunday, May 14, 2017

The 2018 Geezer TARC season begins...

Now that the rules have been released for the 2018 TARC competition, we can start the annual Geezer TARC contest. Here are the rules for 2018:

The rules are the same as those for the 2018 TARC challenge with the following exceptions:

  • Geezer TARC begins with the announcement of the 2018 rules in May (which happened today) and ends with the contestants’ rockets being launched at a single event (date TBD, probably on a Saturday on or near the start of the college football season).
  • The rockets must launch off standard rails; the use of launchers with rods will not be permitted (as per the 2018 Nationals).
  • Each contestant may enter up to two rockets. These rockets may not fly before the official launch date, and the score shall be determined by the first flight of each on that date. The contestant's score shall be the better of the two flights, or the score of one flight if only one rocket is entered.
  • Breaking with previous Geezer TARC contests, contestants must use one of the regulation TARC altimeters (APRA, PNUT, or Firefly) as the "official" measure of altitude. A re-flight will be allowed in the event of an altimeter malfunction, provided the flyer can demonstrate it was not his or her fault (i.e., did not forget to turn it on or provide vent holes to the outside). As per the 2018 rules, the altimeter used to record altitude may be used for no other purpose, though the use of a Jolly Logic Chute Release or other altimeter type is permitted for flight control.
  • There is only one rocket per design, and there are no test or sub-scale flights permitted for the design. Its merit will be judged solely by the rocket’s performance at the contest launch. If two rockets are entered, they must be of substantially different design - different number of motors, fins, or something major - an inch shorter or taller does not constitute a substantial difference, nor does the same design at a different scale (which will be very hard to do this year with the restrictions on the body tube diameters).
And so it begins... May the odds ever be in your favor!

A little launching...

Late April/early May can be a busy time for HARA, with schools requesting rocket assistance/demos for their Space Week activities.  Our club VP and his wife did an outstanding job with "Build it/Fly it" sessions at a couple of local schools, and Duane got tapped with performing the annual rocket demo at Horizon Elementary. Despite the small field, I love the event at Horizon - the enthusiasm of the kids is terrific - so I volunteered to assist in the Thursday afternoon launch. It also gave me an excuse to take part of a day off work, which ain't a bad thing these days.

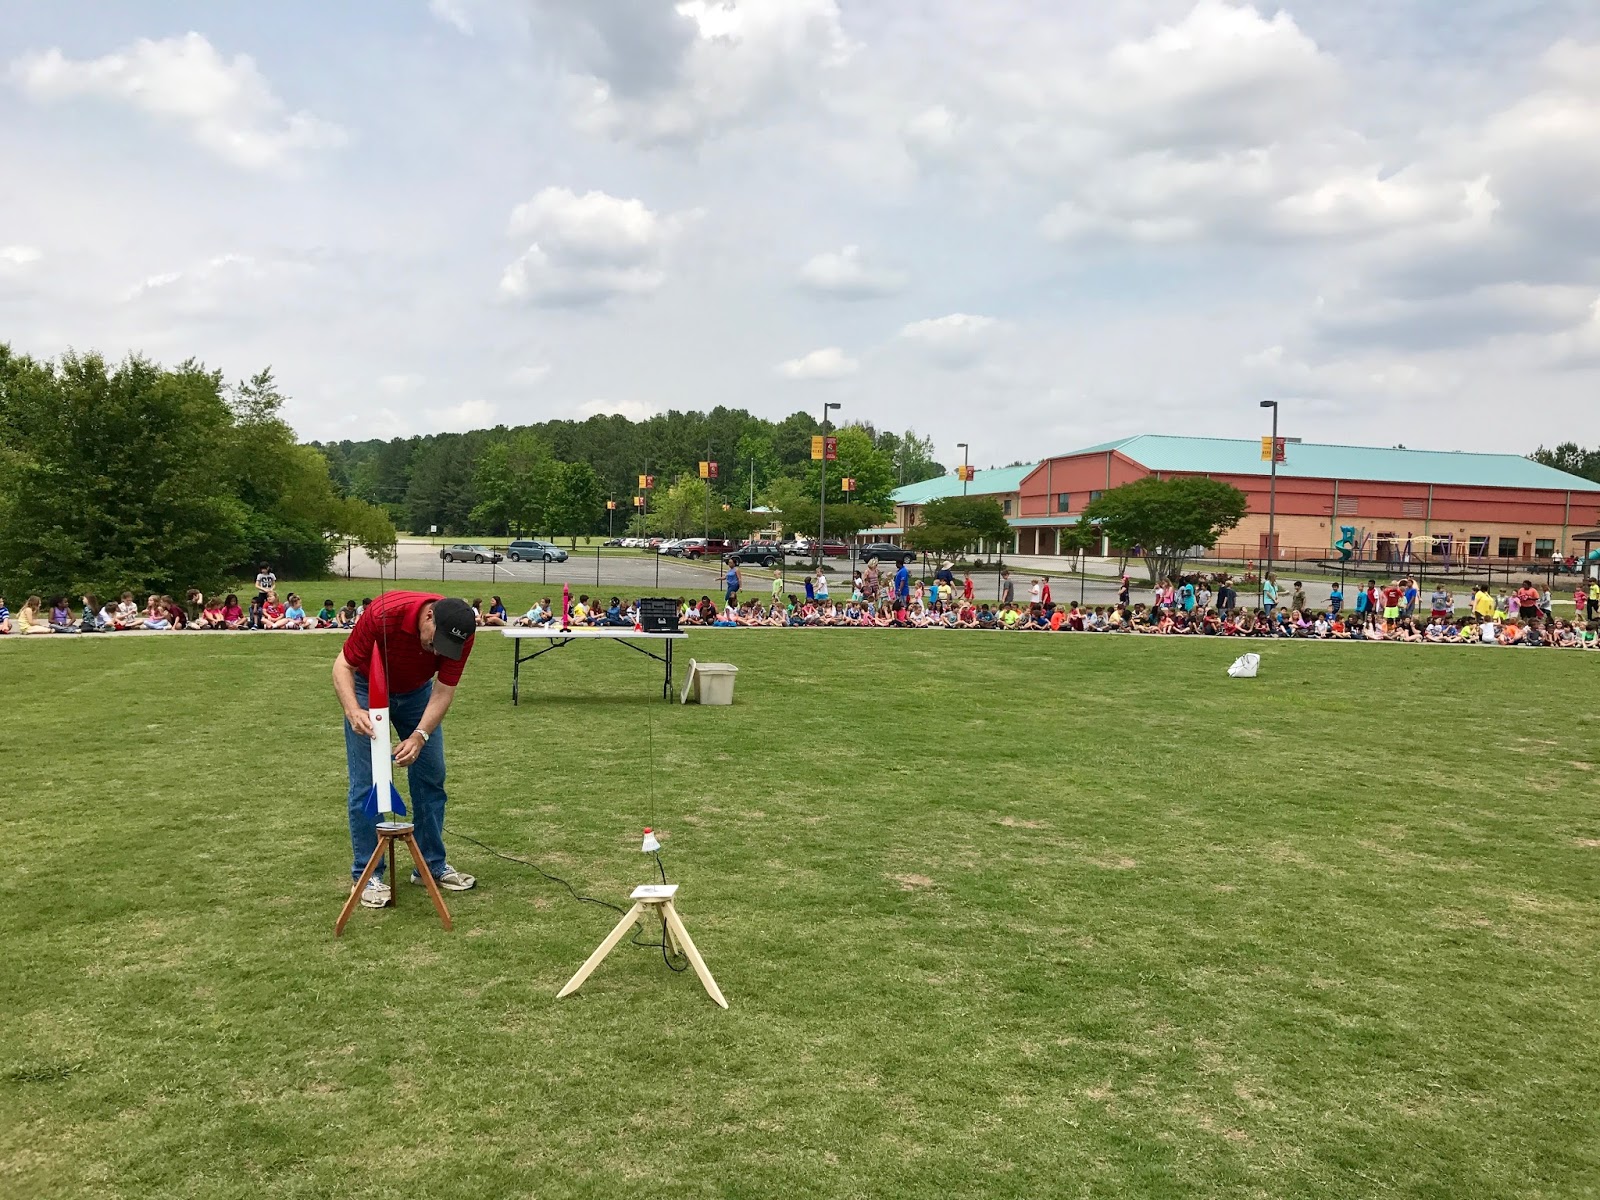
Duane loads his School Rocket as the Horizon students file in on the north side of the field (Click to enlarge).
We arrived at the school around 1, set up Duane's pads and controller, and unpacked the rockets. Each of us had brought 3 - I followed a school theme with my Estes Pink Crayon (B6-4), Skywriter (A8-3), and Generic (A8-3), whereas Duane had prepped his Odd'l Rockets Birdie (A10-3T), Estes Make It Take It (A8-3), and BMS 3" School Rocket (D12-3). The Launch Control Officer (LCO) for the demo would be Beth Bero, an outstanding Horizon teacher who is into science stuff. She must have been a lucky LCO, for we dd not loose any of the 6 rockets launched, and there was only one minor flight deviation when the nose cone of the School Rocket separated from the rest of the model at ejection. A post-flight check showed that the plastic attach point for the shock cord had broken - sometimes these plastic nose cones need a bit of reinforcing to enable them to withstand the stresses at ejection.

Beth sends the Estes Skywriter on its way (Click to enlarge).
The important thing is that the 700 kids present enjoyed the launch. My thanks to our two rocket retrievers, Cricket and Jason, who did a fabulous job recovering the birds. I am looking forward to next year, and am thinking that it is time to build a mid-power saucer so that we can awe the young ones with the fire and noise of F composite motors. Duane suggests that it would also be a good idea to throw some kits Beth's way, so that the Horizon students can see their rockets launched in the demo. This would most definitely add to the fun.

Starting to set up the range at the Manchester sod farm (Click to enlarge).
HARA's regularly-scheduled club launch had to be scrubbed on May 6 due to high winds, so it was rescheduled for yesterday. Being a low power dude, I normally do not attend Manchester launches, as 2 hours is a pretty long ride to launch some mod rocs, especially with Pegasus field just a few blocks away. However, I was in the mood to launch some mid-power rockets, so I grabbed my Estes Trajector and Majestic and hitched a ride with Duane up to the sod farm. We arrived around 9:30, just as the clouds were making way for the Sun, and joined in with setting up the range, which opened around 10:30 or so. The crowd was light, as is the norm with make up launches; I estimate that about 60 rockets were launched on Saturday, at a very leisurely pace.

My Trajector is first off the pad on an Estes F15
(Click to enlarge).
And the first to drift into the trees (Click to enlarge).
Even though the skies were rapidly clearing, the wind was still high, in excess of 10 miles per hour out of the north. Due to sod operations, the operators of the farm had situated us on the southwest side of the field, the worst place to be given the wind situation. Needless to say, the rocket gods were very pleased with the number of sacrifices Saturday, and many a bird drifted into the trees to the west and south of our launch position. The first of these happened to be the first rocket launched - my Trajector, on a F15-6. It started out well, with a good straight boost towards the north east, but the rocket stayed aloft too long in the high wind, drifting into the top of a tree near the edge of the field. It hung there, 60 feet off the ground, mocking me throughout the day. Angling the rods and rails helped a bit, but thermals begin to kick in as the day wore on; the crowd spent several minutes watching a mod roc cycle between descending, hanging stationary, and ascending before it finally decided to drift into the trees. It was a tough day for many of the flyers - fortunately, Chris Short was there with his trailer of goodies, enabling rocketeers to purchase kits and motors to replace their losses (or to add to the collection).

Art shoulders his Level 1 rocket for its journey out to the pad (Click to enlarge).
On the high-power side, there were a couple of level 1 certification attempts, one by a University of Alabama in Huntsville (UAH) student. He was very happy to cert level 1 with his black homemade carbon-fiber rocket powered by an Aerotech H motor. Art Woodling's old red-white-and-blue level 1 rocket put in an outstanding performance on an Aerotech I; it even managed to land within the field, thanks in part to a Jolly Logic Chute Release. A UAH rocket team flew a prototype rocket twice on J motors; it featured a deployable glider in a canister, which failed to deploy on both flights. We have had several college teams try deployable gliders in the NASA Student Launch program over the years, most of which have ended in failure. It is very tough to design and build a canister that will cleanly eject from the rocket's interior and then separate to allow the glider to deploy properly. Anyway, the first flight of the UAH rocket landed in the field, whereas the second saw it drifting well beyond the southern treeline. I do not know if it became an expensive sacrifice to the rocket gods, because Duane and I had to leave before the team returned from the recovery attempt.

A member of the UAH rocket team discusses their rocket with Art (Click to enlarge).
Another Manchester launch is now in the books - flew one, lost it. Fortunately, Estes now has the Trajector on sale for 16 bucks, so I'm not out much (unless you count the money I gave Chris Short for an Aerotech Arreaux - I gotta learn to stay out of his trailer of goodies).

Saturday, May 13, 2017

The pad's on fire!

Last Saturday Duane and I joined members of Liberty Middle School's TARC team at Pegasus field for an end-of-year celebratory fun launch. The day was sunny, albeit quite breezy - most of the rockets drifted much farther downwind than they travelled up. Despite the wind, there were quite a number of students and parents present for the launch, which featured the 3 inch diameter Balsa Machining Service School Rockets (an awesome deal, btw) built by the team earlier in the year, along with a few Estes rockets. Liberty brought the rockets and motors, and it was up to me and Duane to furnish the launch gear. We were prepared - I set up my trusty camera tripod launcher and unpacked my Pro Series launch controller while Duane placed his two Tilt-A-Pad clones (1/8" and 3/16" rods) next to the clips of his very nice home-brew controller.

Liberty Middle's TARC team gets ready to start their last launch of the school year (Click to enlarge).
The first School Rocket's flight went without a hitch - straight up on an Estes E9, with a soft landing a considerable distance downwind from the pad. However, the E9 motor in the second model, which was poised atop my pad, completely blew out the nozzle upon ignition. As the rocket sat motionless amid an expanding cloud of smoke, hot propellant flowed freely from the bottom, catching both the rocket and my pad - namely the plastic top of the camera tripod underneath the blast deflector - on fire. It took us a few minutes to extinguish the flames, and I stared mournfully at the melted part of my pad; the deflector will obviously have to be replaced, and I may have to do the same for the tripod  head as well. The bottom of the School Rocket was severely burned, but enough was left of the fins and motor mount to enable it to make a safe and stable flight a few minutes later. That rocket was one tough hombre!

Did I mention that I am beginning to hate Estes E motors?

Smoke billows from the burning pad and
School Rocket (Click to enlarge).
Aftermath: The top of my pad (Click to enlarge).
Aftermath: The bottom of the School Rocket
(Click to enlarge).
The scorched School Rocket takes flight
(Click to enlarge).
The rest of the launch went pretty well, with the only loss being a Quest Nike Smoke, which drifted way out of the field to be lost somewhere in the high grass - the combination of C motors in small rockets and a windy day is not a good one. There were some nice flights, including those of an Estes Black Star Voyager and a Renegade-D, both of which landed within the field. Duane and I left Pegasus around 2 and headed to the U.S. Space and Rocket Center, where we helped Vince set up a small rocket display outside the Space Station simulation area. We chatted rockets with the passers-by for about 3 hours before packing up for home.

Lift off of an Estes Black Star Voyager
(Click to enlarge).
And the crowd watches it descend under chute
(Click to enlarge).
A Liberty team member hooks up an Estes Patriot
(Click to enlarge).
The Renegade-D gets going (Click to enlarge).
All in all, a good day - now to make repairs to my launch pad. I'm wondering if I should insist that all Estes E motors launch off someone else's from now on. It seems the safe thing to do...

Vince mans the display at the USSRC (Click to enlarge).