Saturday, August 29, 2015

Geezer TARC launch!

Well, today was the long awaited day - a bit on the cloudy side, with winds in the 8-10 mph range. However, the rain held off long enough for us to complete the Geezer TARC launch, and I must say it was interesting - for a lot of reasons.

So, where to begin? The wind was out of the South East, so we set up the range at the south end of the farm driveway. There were 5 pads - Duane's TARC rail pad, my MPR pad with a quarter inch rod, Woody's tower, Duane's wooden LPR pad, and my camera tripod LPR pad. Naturally, each pad had a controller, with the wooden LPR pad connected to Woody's crank type launch controller, which was a big hit with the kiddos that came out today. Forget batteries - they loved swiftly turning the crank to charge up the capacitors so they could launch the rockets! A classic example of low tech appeal...

Art's 45 year old scratch build lifts off as Vince and
Chuck look on (Click to enlarge).
Elliot's V-2 heads into stormy weather (Click to enlarge).
The 2016 Geezer TARC contestants that showed up at the Harvest horse farm were Duane, Woody, Vince, Randy Tyler, and yours truly, which was a couple more than last year. Geezer TARC is growing and I like seeing new faces in the competition; it adds variety and increases the challenge. I wish to give a big shout out to Randy Tyler - He came all the way from Memphis to launch with us today. That's real dedication! Anyway, Duane and I had 2 rockets, Vince sort of had 2 rockets (he used the same payload section on both), and Woody and Randy each brought one.  There were several non-contestants as well. Nate was there to cheer us on, despite feeling crappy, Art Woodling showed up with a couple of vintage model rockets, Woody had a few friends with their kids and rockets, and Elliot Laramie brought his son Joseph out for his first rocket launch. I do believe Joseph is going to be a range LCO in a few years - he was very enthusiastic about the launch and quickly learned how to handle the launch controllers. And I must not leave out Chuck Pierce, who arrived on the field with a Der Red Max modified to accept 29 mm motors. Mind you, I'm not talking about the big Estes Mega Red Max; this was the standard Red Max that is sent out of sight on a C6-5. I think Chuck wanted to put his up in the stratosphere, as there was serious talk of flying it on a G motor. My initial impression was that it was a goner on the first flight. Much to my surprise, I was wrong - the rocket was recovered after flights on an E30 and a F21. Der Rot G-Maximus still lives!

Chuck's Der Rot G-Maximus is a blur on an F21
(Click to enlarge).
Elliot and Joseph launch an Estes Ventris
(Click to enlarge).

There were a total of 7 Geezer TARC flights, and things did not start out well. Duane was the first to launch; it was a good flight, except that he forgot to turn on his altimeter, so we had no idea of the peak altitude.  It was an embarrassing moment for Mr. Check List, and I will be sure to remind him of this at the appropriate times <evil smile>. Vince flew his Frankenstein creation built of various kit parts next; unlike the rest of us, he just threw the rocket together, without simulations or anything. He had the simple goal of getting a qualified flight, but this one would not be it - the rocket got some air on an F44 motor, but the shock cord burned through. The parachute saved the altimeter and eggs, but the sustainer hit the ground hard and crumpled. Despite this disqualification, Vince was undaunted and proceeded to kluge together his next flight - Baron Frankenstein would have been pleased with the scavenging of the corpses of past kits.

Duane's 1st flight leaves the rail (Click to enlarge).Vince's creation #1 starts its ill-fated journey
(Click to enlarge).


Woody was up next. His rocket reached 766 feet on a F20 White Lightning motor (I love White Lightning motors - they are brilliant and loud).  However, the parachute failed to deploy - ouch, and another disqualification. Randy Tyler then flew his patriotic red, white, and blue rocket on an Aerotech F32. This beauty over performed, topping 1000 feet. It looked like we were going to have our first qualified flight of the day, but alas, one egg was broken. 4 flights, 4 disqualifications. Things were not looking good.

Randy's patriotic rocket heads up into cloudy skies
(Click to enlarge).
Woody's rocket clears his tower (Click to enlarge).
It was time for me to get off my rear and fly one of my rockets. Nemesis, flying on 2 Estes E12's, was to be my primary bird today; however, there had been several modrocs flown off the low power pads using E's, and every darn one of the things went boom. Elliot's SpaceShip 1 had an E blow out on the pad, and Vince's (Rocketarium?) Hexagon was shredded by another E CATO as it cleared the rod. I looked at my beautiful Nemesis and thought of two of those things blowing her lower half to tiny bits. Chickening out, I switched to #2, my F powered backup. It turned out to be a good choice - #2 soared to 894 feet and was down in 56 seconds. And, wonder of wonders, the eggs were undamaged. The jinx was broken; we had our first qualified flight of the day. And with an 84 score, I was in the lead.

Vince's Hexagon is blown apart by an E motor CATO
(Click to enlarge).
#2 streaks off the pad on an F32 motor (Click to enlarge).


Vince followed my launch with Brother of Frankenstein, which also made a qualifying flight. At 41.6 seconds, the time was good, but the altitude was way low, at 656 feet. Still a qualifying flight, and Vince was happy. I was happy too, as I was in first place.

And then came Duane's last flight...

He readied his yellow and purple backup rocket, and after making sure to turn on the altimeter, placed it on the pad. The rocket blasted skyward on its F motor, achieving 878 feet, the best altitude of the day - only 28 feet over the mark. It also turned in a pretty good time - 48.9 seconds, just 2.9 seconds long. At this point, I knew I was doomed. Only a cracked egg could save me, but Duane's rockets feature his super-spiffy molded egg protectors - the rocket could come in ballistic and the damn eggs would still remain unscathed. And I was right; the eggs were undamaged. Duane now had a 39.6 score, twice as good as my 84.5. Now was the moment of decision - would I make another attempt using Nemesis?

2016 Geezer TARC results (Click to enlarge).
The flying bits of Vince's Hexagon swam before my eyes, and once again, I chickened out. The glory of winning would not match the agony of seeing Nemesis blown to bits. She will fly, but only after I sim 2 D12's and 2 C6's - even though it is a 4 motor combo, it will be much safer than flying using those sticks of dynamite Estes calls E motors. Duane can claim bragging rights again this year; I'll get him next time.

Duane Mayer - Geezer TARC champion for the 2015-16
season (Click to enlarge).
Vince Huegele gets the Flying Pig Award for proving you
can qualify with corpses of old kits (Click to enlarge).


Thursday, August 27, 2015

Ready to fly!

At long last, after battling with a sprained wrist and stormy weather, my 2016 Geezer TARC rockets are painted, decaled, and ready to fly. The red and white Nemesis is my primary bird for this Saturday's launch - a 4 motor cluster, she is also the heaviest TARC rocket I have ever designed. Fully loaded with eggs, altimeter, and motors (two E12's and two C6's), she weighs in at 620 grams, just 30 grams under the limit. However, Open Rocket tells me I should be able to reach the 850 foot altitude goal with just the two E12's, which gives me a little more margin in weight and reduces the "pucker factor" associated with trying to ignite 4 motors simultaneously. I am still nervous about using the E12's, though - they have a relatively high CATO rate.

My 2016 Geezer TARC rockets (Click to enlarge).
The backup is the old #2. He is pretty conventional, with a standard 29mm motor mount. He is also smaller and about 30 grams lighter than his sister. The limited selection of single use motors means that I am going to have to add about 70 grams of weight to keep from majorly overshooting altitude; otherwise, a F is going to put #2 way, way up there.

The launch begins at 10:30 AM this Saturday - it's going to be interesting!

Sunday, August 16, 2015

Full production at the rocket factory...

Now that I am done with travel for a bit, I can spend some time building rockets. This is a good thing, because the Geezer TARC launch is just around the corner! The wrist I sprained while in California is still giving me a bit of trouble, but I have managed to get two TARC birds built and into the final stages of finishing. The 4 motor powered Nemesis is ready for her first coat of paint, whereas my backup rocket - appropriately named #2 - is in its first coat of primer. #2 is a pretty conventional TARC design, made of standard BT-80 tubes (2.6" diameter) and uses a single 29 mm motor; he will fly, though I am struggling with the proper motor/weight combination. Weather looks stormy this week, so it will probably go down to the wire as far as getting these rockets all painted and decaled.

From left - #2, Nemesis (in white primer and 2 pieces), Quest Astra
(in back), and Estes Sizzler clone (Click to enlarge).
Joining the TARC rockets in primer is a clone of the old Estes Sizzler (#1906) and a starter kit from Quest, the Astra. I am a big fan of Quest designs, but the kit components can be less than - which is why I would hesitate to use the Astra in a beginning rocket class. The motor tube is flimsy, the body tube has deep spirals, and the laser cut fins are too big to fit in the slots on the tube, requiring a fair amount of sanding. Not much fun for a beginner, especially when you compare it to the BMS School Rocket, or even the venerable Estes Alpha.

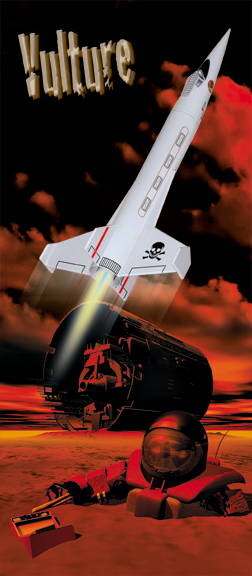
Squirrel Works Vulture (from the Squirrel Works web site).
Estes Sizzler in the 1985 catalog (Click to enlarge).
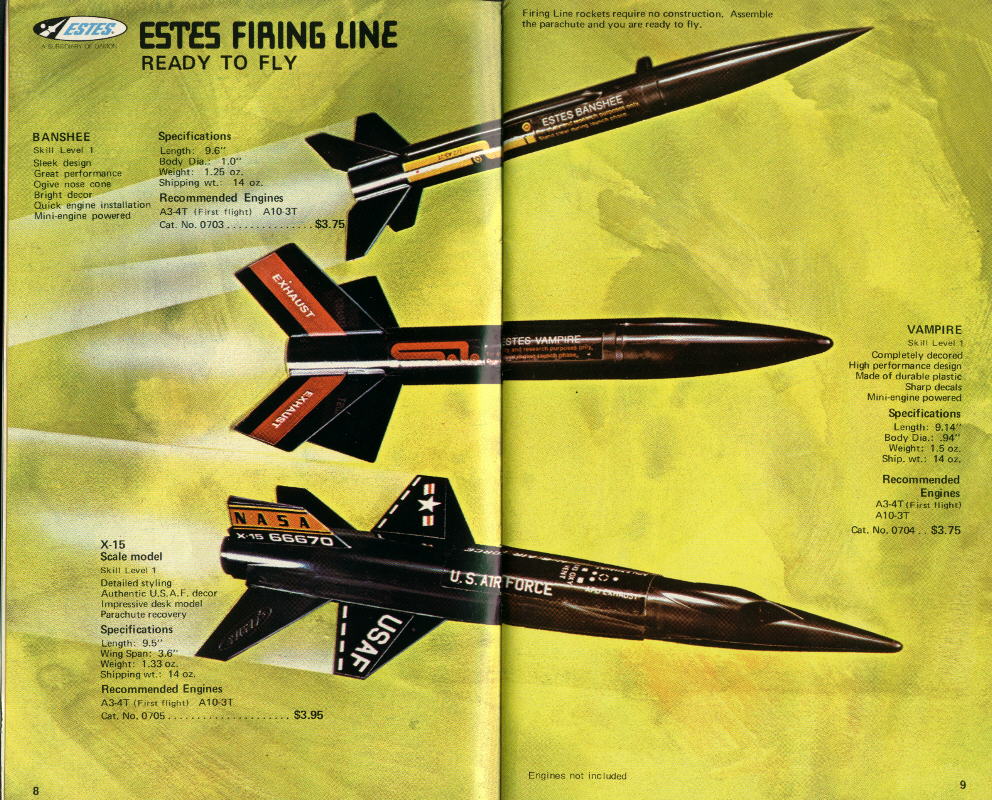
I am also working on a couple of other kits - a Squirrel Works Vulture, which is now ready to have the wood parts sealed and sanded smooth, and the re-release of the Estes Goblin, which I threw together watching Star Trek and Svengoolie last night. It will be ready to go to finishing once I have filleted the fins with wood glue. Building the Goblin has sparked an anticipation of Halloween - I think my next build will be a clone of the old Estes Vampire, to keep the Goblin company. I have the dimensions, and I am pretty sure I have the parts to make a very close replica of this all plastic model,  which was part of the Estes Firing Line series (1973-1976).

Estes Vampire in the 1974 catalog (Click to enlarge).
I did a check of this year's builds against the list I made last October. I have finished the Big Bertha, Beulah, Centuri Micro Probe, Space X Falcon 9, and Scrambler; have not done the Gyroc, S.S. Cestris, Orbital Transport, and the Tiny Tim scale model. 5 out of 9 complete - not too shabby given my rocket ADD. Still have about a month and a half till October, so I may get one or two of the remainder built; you never know.

Lists are only guidelines anyway.

Saturday, August 15, 2015

A second try at sponsoring a rocket contest...

Well, I had no entries in my first rocket contest. However, I remain undaunted...  The second contest description has been posted to Ye Olde Rocket Forum (YORF).  This time, I am digging into the kit stash to offer a classic for a prize - the U.S.S. Enterprise from the 1975 catalog!


Here's the contest description:

ORC #2 - Designing for the EAC

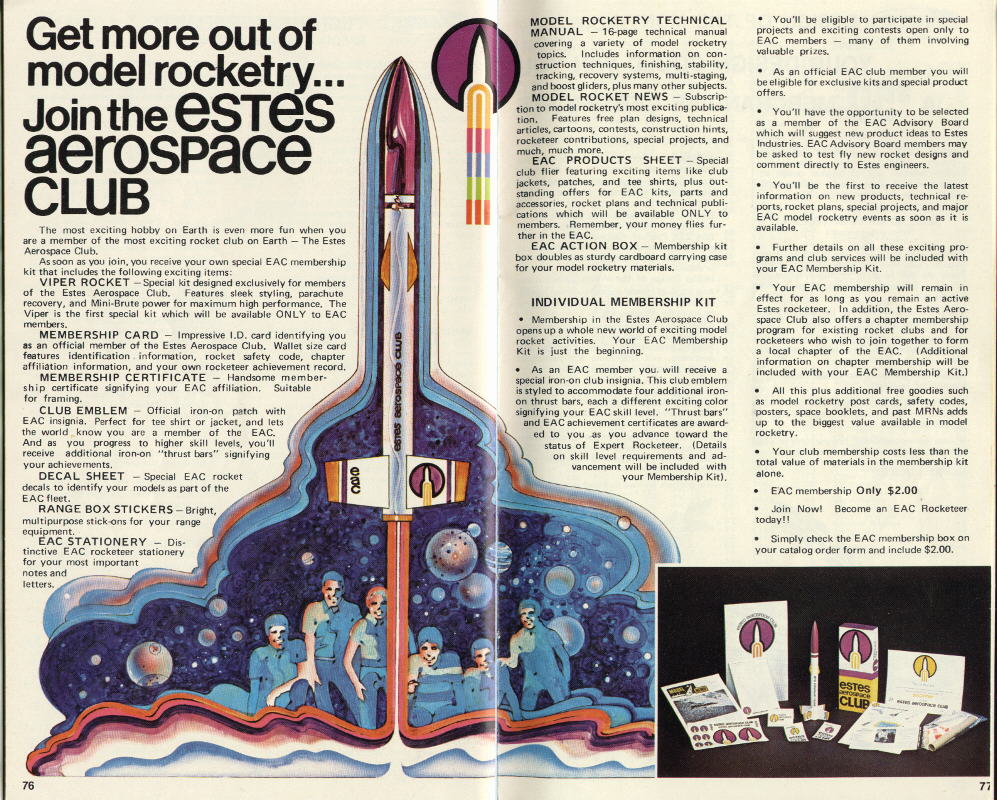
EAC ad from 1973 Estes catalog (Click to enlarge).
Back in 1972, the Big E (Estes) established the Estes Aerospace Club (EAC), the “most exciting rocket club on earth.” EAC members could advance skill levels by building Estes kits of increasing complexity; for example, to get to level 3 (Craftsman), you  had to assemble and fly 4 Estes kits other than those used to achieve level 2, with at least 3 being SkiII Level 3 (one had to be a multi-stage rocket). Your level advance was marked by a certificate and a colored thrust bar, which was used to augment the iron on emblem on your shirt. This was a status indicator among rocketeers in my neighborhood; if you didn’t have at least the green thrust bar (Advanced) on your T-shirt, you weren’t a rocketeer.
EAC Firecat (Click to enlarge).
The next best thing about the EAC was the ability to get  exclusive kits - the EAC Viper, and later (in 1974), the Firecat. The Viper was one of my all time favorite rockets, and one of the first models I cloned. The Firecat was a unique target-drone type design featuring an Honest John nose. Unfortunately, there were no EAC specific rockets after this; Estes phased out the club in 1986. A follow-on, the Estes Space Program, started up in 1988, but it did not seem to have the appeal of the old EAC. The Yankee Clipper rocket of the Estes Space Program, while patriotic, did not even begin to approach the coolness of the Viper or the Firecat. So, for many years, I have been wondering what a third EAC rocket would have looked like. Would it have been an exotic starship design? Or perhaps a cluster or multi-stager? Maybe even a boost glider? Who knows?

Which brings me to the point of this contest: Can you design that third rocket, taking into account some of the things a rocket company has to worry about, like parts availability and cost? A exotic design is great, but if it costs a fortune, it may very well not make money. Too elaborate and complex may scare the less experienced rocketeers away, resulting in poor sales, even if the production cost is reasonable. And generating new parts is a pain and adds more cost; better to use parts from the existing inventory. So this, then, is the goal - come up with an awesome looking EAC rocket while minimizing the cost and using only the standard Estes parts available in 1974.

Are you up for the challenge?

The rules:
  1. Design and build a stable rocket powered by one or more 13 mm, 18 mm, or 24 mm motors. This rocket must be constructed only from components available for sale in the 1974 Estes custom parts catalog (http://www.ninfinger.org/rockets/custom_estes/custom_estes.html). Substitutes may be used, but only if they are exact matches in size and shape to the catalog components. Custom decals may be used. Assign it a skill level based on complexity/difficulty.
  2. Take a “glamour shot” of the rocket when it is completed.
  3. Make at least one flight of the model, marking this flight with pictures (minimum of one pad shot and one showing the rocket lying on the ground (or in a tree) at the end of the flight.
  4. Document the build and the flight on a thread in this category
  5. Only 1 entry per contestant, please. Contest deadline is 11:59 PM Central Daylight Time on October 15, 2015.
How to participate:

a) Send a PM on YORF to Vanel or an email to cookewj [at] comcast.net stating your intent to enter the contest.
b) Create a thread in this category containing the following items before the contest deadline:
  • Open Rocket or Rocksim design file. Traditional Geezers may submit a paper plan showing all dimensions (including CG/CP locations) and a parts list. Parts list or design file component names must conform to the part numbers in the 1974 custom parts catalog. The rocket’s name and skill level must be part of the submitted design (Use the comments section for the skill level designation if you use Open Rocket or Rocksim). If the rocket features decals, a jpg, png, or pdf of the decal sheet with specified dimensions in inches must also be submitted.
  • A file listing the parts and their costs according to the catalog, and a total cost of the rocket. This file may be a text file, a csv file, an Excel-compatible spreadsheet, or a scan of paper calculations. Note: Decal cost shall be computed according to the following formula, which was derived from a linear fit to the costs of waterslide decals in the custom parts catalog:
               Decal cost (in dollars) = $0.283 + 0.006 x area of decal sheet in inches
  • Post (hopefully multiple posts) documenting the build and flight.
  • The “glamour shot."
  • The two flight images described above (more if you wish, but please, no more than 5).
Scoring:

Design (40 points maximum):
     20 points for Open Rocket file, Rocksim file, or paper plan/parts list (and decal sheet if such are used)
     20 points for minimizing costs, computed according to
               Number of points = (# entries + 1 - cost rank) X 20 / # entries  
               where cost rank is 1 for lowest cost model, 2 for next lowest cost, and so forth.

Documentation (20 points maximum):
     10 points for build and flight documentation thread
     4 points for “glamour shot"
     3 points for pics of rocket on the pad and just after landing
     3 points for image of rocket in powered flight and/or descending via recovery device

Flight (15 points maximum):
     15 points for stable flight

Appeal and complexity (25 points maximum - determined by vote of the YORF membership):
     Number of points = [Sum of (# entries + 1 - voter rank)] X 20 / (# of voters x # entries)
                                     + [# of votes agreeing with skill level x 5 / # of voters]
     where voter rank is 1 for first place, 2 for 2nd, and so forth. The sum is over the # of voters.

Winner is the one whose entry has the most points.

Prize table:
  • $60 eRockets gift certificate 
  • Estes Leviathan 
  • Estes #1275 Starship Enterprise (OOP)
  • Estes Altimeter
  • Semroc Centaur
  • Estes Snitch (OOP)

Friday, July 31, 2015

A drag of a topic...

As I mentioned in previous posts, this year's TARC competition will probably see many teams struggling to loft their two eggs to altitude without busting the weight limit on the rocket. Most teams use the Tim Allen philosophy when it comes to increasing altitude - use a bigger motor (more power!). But there is another way, one that can result in a gain of tens of feet in the rocket peak altitude (maybe as much as a hundred). This approach, used by contest rocketeers all over the world, is largely ignored by TARC teams because it adds considerable work and time in building the rockets. Drag reduction can't be done in 30 minutes, but the math and years of experience shows that it can produce significant improvement if done properly.

Long before we had personal computers, a lot of smart folks were looking at drag and its effects on rocket flight. The math is fairly complicated - at a basic college calculus level - but even back in the 60's and 70's, advanced rocketeers were producing tables and formulae to estimate the amount of drag a model rocket would experience in flight. A oversimplification would characterize the drag by a single dimensionless number, Cd, called the drag coefficient. A flat surface has a drag coefficient well above 1, whereas a sphere has a Cd around 0.45. Most of my rockets seem to have drag coefficients around 0.75 - at least that's what I get when I try to match the simulations to the altitude profile given by the altimeters. The deal with drag is that you want to keep the airflow smooth around the rocket - any disruption, whether it is caused by rail buttons, base drag at the rear of the model, rough finish, or improper match of the nose cone to the body tube, increases the drag coefficient and reduces the altitude. TARC rockets need rail buttons or launch lugs (unless you want to spend the bucks to build a launch tower), so not much can be done there. However, every rocket can have a smooth finish - all that takes is additional work.

Rocksim screen capture showing Cd override panel (Click to enlarge).
To get an idea of how altitude depends on drag coefficient, I fired up my copy of the Rocksim software and loaded a past TARC design, the Over Easy. Rocksim has several advantages over Open Rocket in the technical area - you can design models with external pods and fins on fins, you can run simulations to figure out the optimum rocket weight, and you can put in your own values of the drag coefficient for the model (Open Rocket lets you do something similar by allowing you to choose the component finish - rough, unfinished, regular paint, smooth paint, and polished - but you just can't put in a number). I kept everything constant (weight, motor, etc)  except for the drag coefficient, which I varied from 0.55 to 1.05. The results are below - note that the altitudes range from 730 to over a thousand feet!

Effect of varying the Cd.
The catch is that a smooth finish requires paint, which adds weight to the rocket. So, as with anything in the real world, there is a tradeoff; you want as smooth a finish as possible without adding so much weight that you eliminate the altitude gained by reducing the drag. Experience has shown that a one or two primer coats, each followed by a vigorous sanding with increasingly fine grit sandpaper, and then a base coat of paint can yield a pretty smooth finish with only a modest weight increase.

Back in 1970, Estes produced Technical Report TR-11 "Aerodynamic Drag of Model Rockets". I very much recommend that all TARC teams and serious rocketeers read this, even though it is filled with math and stuff. At a very minimum, they should read pages 39-47, where there are some simple guidelines for drag reduction and flight test data for various configurations and finishes for an Estes Alpha. By airfoiling the fins, adding a boat tail, and putting a smooth finish on the model, they were able to improve the Alpha's measured altitudes from 319 to 446 feet, which is huge! This is a increase of about 30%, which is in line with the Rocksim simulations I performed for the Over Easy.

In case you can't locate a copy of TR-11 online (Google "Estes TR-11 drag"), here are the 5 rules for drag reduction:
  • Rule 1: USE GOOD WORKMANSHIP
From the beginning of model construction, take time to sand all parts for a good fit: match the nose cone - body tube junction carefully, round the leading edge and sharpen the trailing edge of the fins. This initial work is a great step toward the reduction of the pressure drag of the rocket.
  • Rule 2: ALIGN FINS AND LAUNCH LUGS PROPERLY
Correct fin alignment will keep the model from rolling during the ascent; this will eliminate unnecessary induced drag caused by the fins twisting through the air at angle of attack. Misalignment of the launch lug can cause flow separation on the body tube and excessive pressure drag.
  • Rule 3: PUT A SMOOTH FINISH ON THE MODEL
Besides giving a high quality appearance to the model, the smooth finish delays transition of the flow to the high drag turbulent boundary layer condition. Even when the flow is turbulent, a slick surface will have less drag than a rough surface; so to reduce skin friction drag get the model rocket finish mirror-smooth.
  • Rule 4: FILLET THE FINS
Reduce the interference drag by filling in the fin-body tube junction to guide the air smoothly past the fins.
  • Rule 5: BOAT-TAIL WHENEVER POSSIBLE
Anytime the body tube diameter is greater than the engine diameter because of some special design feature, boat-tail the model. The base drag, which contributes an appreciable fraction of the total drag will be cut drastically by the boat-tail.

The moral of this post? A slick rocket is a good thing.

Thursday, July 30, 2015

Rockets for the 4th...

For the past few years, I have tried to commemorate the 4th of July by building a rocket with a patriotic theme during the month. I usually start in late June with the intent of finishing by the 4th, but somehow things always come up - travel, weather, cosmic rays, whatever. This year it was business travel, and a lot of it; I have been away for nearly half the month, which doesn't leave much time for rocket building (or blog posts). However, I did finish the rocket earlier this week, keeping alive the tradition of getting the model built by the end of July. So I guess I will need to start a build in early June if I want to get it done by the 4th, or change my expectations to completing the rocket by July's end.

This year's choice was the Quest America, a simple four fin rocket that has been around for a few years (It was in the 2010 catalog). It was an easy build, going together quickly, and the two color paint job (blue fins, white body and nose cone) was not hard to do with Tamiya tape. One of my main gripes with Quest kits is that they feature "peel n cuss" stickers, which are a great source of annoyance - they look terrible and are difficult to handle. I much prefer water slide decals, so I replaced the white star fin stickers with Estes Comet decals that I ordered from Excelsior. I tried to replace the main body sticker with a waterslide decal I made on a color laser printer, but the decal was so long it kept tearing. This forced me to use the Quest sticker, which required some trimming (and cursing) to fit properly. I must confess the rocket doesn't look too bad; the white body tube seems to mitigate some of the shiny associated with peel n stick.

Here's the beauty shot:

Quest America (Click to enlarge).
And while we are on the subject of this year's patriotic model, here are a few from the past:

Estes Liberty (2011 - Click to enlarge).Citation Patriot (2012 - Click to enlarge).
Estes Yankee (2013 - Click to enlarge).Centuri Screaming Eagle (2014 - Click
 to enlarge).

2015 patriotic rocket done - back to other builds.

Monday, June 29, 2015

Thoughts on a beginner rocket...

I am often asked what the best rocket is for a beginner, or other variants of this like:
  • What is a good rocket for me and my kid to build?
  • What rocket would you recommend for a school (cub scout, girl scout, 4H) group?
  • I (and/or my kid) want to fly at your launch this weekend. What can I get?
The answer, of course, depends on what you wish to achieve. Do you
  1. Want to learn/teach the basics of rocket building?
  2. Want something for a one-time launch, and have plenty of other things to do?
If you fall into #2, the answer is easy. Pick up a RTF (Ready To Fly) rocket at Hobby Lobby, Hobby Town, Michaels, or a local hobby shop. Estes makes quite a few of these, ranging from standard 3 fins and a nose cone (3FNC) models to colorful crayon rockets - you can find a few listed here.

If you are of the category #1 persuasion, you have many, many options. If you are building the rocket solo, or with another family member, the important thing to consider is how much time you want to spend in the build. Messing with wood and paint is rewarding, but it does take time - not good if you want to fly tomorrow morning. Fortunately, there is a whole line of rockets produced by Estes and Quest that feature plastic parts that are easily assembled in 30 minutes or so. The Estes Alpha III is my favorite; their Generic kit is also nice. One of the more unusual kits is the Dragonite, which snaps together, requiring no glue - there were quite a few of these at a recent cub scout launch. Quest has their line of Quick Kits, with the Astra III being the most popular. Any one of these will have you ready to fly in under an hour, and you will still learn the basic parts of the rocket.

These rockets are also good for group builds and you can buy them in bulk. I get many of the Alpha III's from AC Supply, where you can get 12 for $72 ($6 per rocket). Quest also offers several bulk packs featuring the Astra III, Starhawk, and other fast builds.

Alpha III bulk pack (Click to enlarge).
Those of you wishing to take your time and enjoy the full experience of rocket building should choose a level 1 kit. There are TONS of these, the most venerable and well known being the Estes Alpha. Practically every rocket company out there - Estes, Quest, Semroc/eRockets, Fliskits, Aerospace Specialty Products, Custom, Sunward, Squirrel Works, Balsa Machining Service, Pratt Hobbies, etc., etc. - offers level 1 kits. Pick one; you can't go wrong. It'll take you an hour or so to build the rocket, and a few hours for the glue to dry. The painting and finishing is a matter of preference - many rockets are flown "nekkid"for the first time; some rocketeers feel this is a way for the model to earn its paint. I like to spend days getting a nice finish; most models fall in between "nekkid" and "catalog quality".

I have always been partial to the Estes Alpha, as I have built a zillion of these over the years. A new favorite is the Balsa Machining Service's School Rocket.  At $5.25 a model, it's cheap, has quality parts (laser cut balsa fins and slotted body tube, streamer, balsa nose cone), and goes together very nicely. Great for first timers, and also really good for groups who have an hour or more in their build session.

Estes Alpha (click to enlarge).BMS School Rocket (Click to enlarge).
There are plenty of rockets out there - pick the one you like, and have fun!